Engineering life-changing and innovative mobile applications is the norm nowadays. Software engineers have to go a step further to build outstanding apps while providing more value to their users. One way to do that is by integrating push notifications.
Push notifications are messages sent to a user's device that are either displayed on the device's notification bar or consumed in the background by your application.
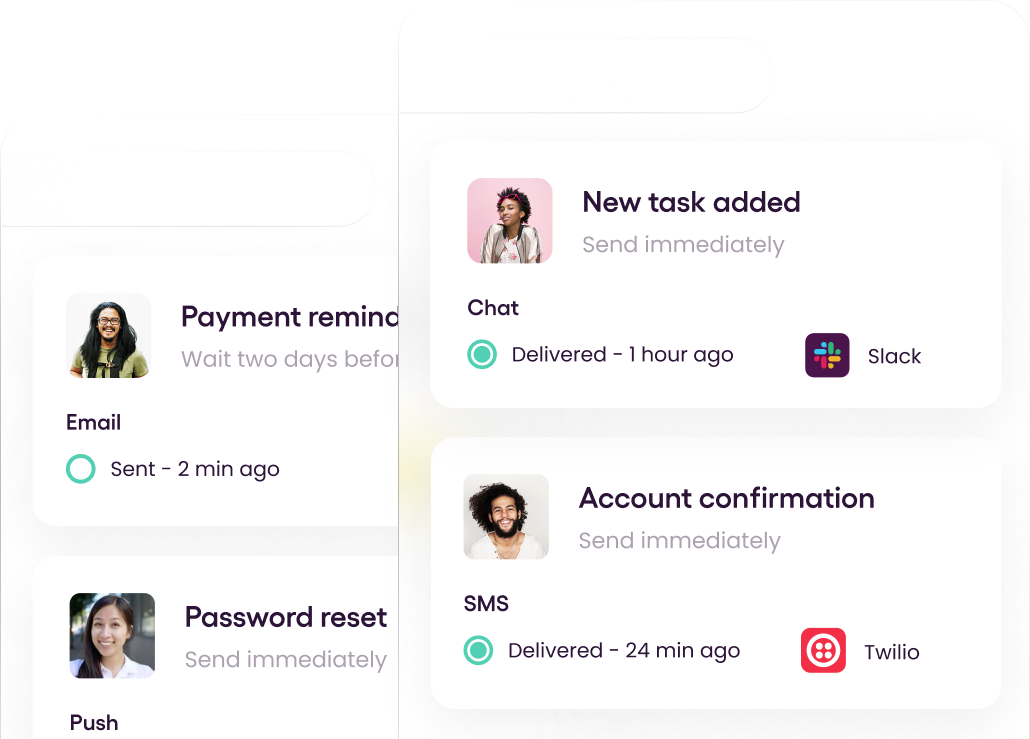
Push notifications can be used to drive user engagement and send personalized statements and alerts. For instance, a sports app can send push notifications to its users whenever their team scores or a banking app can notify users whenever a transaction happens in their account.
In this article, you'll learn about push notifications, the different providers of push notifications, and how to implement push notifications on iOS using React Native, Flutter, and Swift. You'll also see some of the benefits of using a multichannel provider like Courier.
Sending iOS Push Notifications (Pre-Note)
Building a delivery service that can effectively cater to push notifications is challenging, so developers use third-party services to send and deliver their notifications. The most commonly used delivery services are Apple Push Notification service (APNs), Firebase Cloud Messaging (FCM), and Courier.
The following section will explain how you can implement push notifications with each of these services using React Native, Flutter, and Swift.
Apple Push Notification Service (APNs)
APNs is an iOS push notification delivery service that is already integrated into the device's operating system. It's a good starting point for iOS developers looking to add push notifications to their apps.
Pros and Cons of APNs
As APNs is already integrated into the iOS operating system, you don't need to add libraries to include a push notification service. You can also generate local notifications from your app and display them to the user.
However, if the user is offline, APNs can only queue a single message for delivery, so old messages will be lost and won't be sent to the user.
How to Implement APNs
Whether you're building iOS apps with Swift, Flutter, or React Native, you can seamlessly integrate APN push notifications.
You need to configure your app for APNs as well as enable Push Notifications in Xcode under App > Capabilities.
Please note that you need to be enrolled in the paid developer program to see this capability.
Swift
You need to request permission to display alerts, play sounds, or badge the app's icon before delivering push notifications. After that, you need to register the device with APNs to receive a globally unique token address. With this address, you can send push notifications to the device from your server through APNs. To achieve this functionality, you can use the code below:
1
2
3
4
5
6
7
8
9
10
11
12
13
14
15
16
17
18
19
20
21
22
23
24
25
26
27
28
29
30
31
32
33
34
35
36
37
38
39
40
41
42
@main
class AppDelegate: UIResponder, UIApplicationDelegate {

func application(_ application: UIApplication, didFinishLaunchingWithOptions launchOptions: [UIApplication.LaunchOptionsKey: Any]?) -> Bool {

let center = UNUserNotificationCenter.current()
center.requestAuthorization(options: [.alert, .sound, .badge]) { granted, error in

if let error = error {

// Handle the error here.
print(error)

}

// Enable or disable features based on the authorization

if (granted){
UIApplication.shared.registerForRemoteNotifications()
}
}
return  true
}

func application(_ application: UIApplication,
didRegisterForRemoteNotificationsWithDeviceToken
deviceToken: Data) {

// Send token to your server to send notifications
print(deviceToken)

}

func application(_ application: UIApplication,
didFailToRegisterForRemoteNotificationsWithError
error: Error) {

// An error occurred
print(error)

}
}
Flutter
To use APNs for push notifications in Flutter, add the flutter_apns package into your pubspec.yaml file.
Then, add the following lines to the didFinishLaunchingWithOptions method in the AppDelegate.swift file of your iOS project:
1
2
3
if #available(iOS 10.0, *) {
UNUserNotificationCenter.current().delegate = self as? UNUserNotificationCenterDelegate
}
To register callbacks that are triggered every time a notification is received, update your main.dart file to include the following:
1
2
3
4
5
6
7
8
9
10
11
12
13
14
import  'package:flutter_apns/apns.dart';

void  main() {
WidgetsFlutterBinding.ensureInitialized();
final  connector = createPushConnector();
connector.configure(
onLaunch: (message) async {},
onResume: (message) async {},
onMessage: (message) async {},
);

connector.requestNotificationPermissions();
runApp(const  MyApp());
}
React Native
APNs can be integrated into a React Native app using the react-native-notifications package. Run the following command in your project root folder:
1
npm install --save react-native-notificationsWhen the above installation is done, navigate to the ios folder and install dependencies by running the following commands in the project root folder:
1
2
cd ios
pod install
To link the native dependencies, you need to update the AppDelegate.m file located in ios/project_name with the following import at the top of the file:
1
#import "RNNotifications.h"To monitor notifications and support device registration, add the following functions to the AppDelegate.m file:
1
2
3
4
5
6
7
8
9
10
11
12
13
14
15
16
17
18
19
-  (BOOL)application:(UIApplication *)application didFinishLaunchingWithOptions:(NSDictionary *)launchOptions {
[RNNotifications startMonitorNotifications];  // -> Add this line
return YES;
}

- (void)application:(UIApplication *)application  didRegisterForRemoteNotificationsWithDeviceToken:(NSData *)deviceToken {

[RNNotifications didRegisterForRemoteNotificationsWithDeviceToken:deviceToken];
}

- (void)application:(UIApplication *)application  didFailToRegisterForRemoteNotificationsWithError:(NSError *)error {

[RNNotifications didFailToRegisterForRemoteNotificationsWithError:error];
}

- (void)application:(UIApplication *)application  didReceiveRemoteNotification:(NSDictionary *)userInfo  fetchCompletionHandler:(void (^)(UIBackgroundFetchResult result))completionHandler {

[RNNotifications didReceiveBackgroundNotification:userInfo withCompletionHandler:completionHandler];
}
To handle notifications, you need to request permissions and then get a device token. React Native also has methods to handle notifications when the app is in the foreground or in the background. Update the App.js file with the following code:
1
2
3
4
5
6
7
8
9
10
11
12
13
14
15
16
17
18
19
20
21
22
23
24
25
26
27
28
29
30
31
32
33
34
35
36
37
38
39
40
41
42
43
44
45
46
47
48
49
50
51
52
import { Component } from  'react';
import {Notifications} from  'react-native-notifications';

class  App  extends  Component {
constructor(props) {
super(props);

// Request permissions on iOS, refresh token on Android
Notifications.registerRemoteNotifications();

Notifications.events().registerRemoteNotificationsRegistered((event: Registered) => {

// TODO: Send the token to the server so it can send back push notifications
console.log("Device Token Received", event.deviceToken);

});

Notifications.events().registerRemoteNotificationsRegistrationFailed((event: RegistrationError) => {

console.error(event);

});

Notifications.events().registerNotificationReceivedForeground((notification: Notification, completion) => {

console.log(`Notification received in foreground: ${notification.title} : ${notification.body}`);

// Calling completion on iOS with `alert: true` will present the native iOS inApp notification

completion({alert:  false, sound:  false, badge:  false});

});

Notifications.events().registerNotificationReceivedBackground((notification: Notification, completion: (response: NotificationCompletion) =>  void) => {

console.log("Notification Received - Background", notification.payload);

// Calling completion on iOS with `alert: true` will present the native iOS inApp notification

completion({alert:  true, sound:  true, badge:  false});

});

Notifications.events().registerNotificationOpened((notification: Notification, completion) => {

console.log(`Notification opened: ${notification.payload}`);

completion();

});
}
};
Firebase Cloud Messaging (FCM)
Firebase Cloud Messaging is a cross-platform messaging solution that can send notifications and data messages.
Pros and Cons of FCM
FCM's major advantage is the ability to send notifications directly from the Firebase Console. On top of that, you get insightful analytics on how your notifications are engaging with your users. It also has Topics for putting users into subgroups when sending notifications.
However, FCM has no way to view individual users and the messages they've received in a campaign.
How to Implement FCM
You need to configure your app for APNs as well as enable Push Notifications in Xcode under App > Capabilities.
Swift
First, add Firebase to your iOS project and upload the APNs authentication key to the Firebase Console.
Then, register your app for remote notifications and get the FCM token in the AppDelegate.swift file using the following code:
1
2
3
4
5
6
7
8
9
10
11
12
13
14
15
16
17
18
19
20
21
22
23
24
25
26
27
28
29
30
31
32
33
34
35
36
37
38
39
40
41
42
43
44
45
46
47
48
49
50
import FirebaseCore
import FirebaseMessaging

func application(_ application: UIApplication,
didFinishLaunchingWithOptions launchOptions: [UIApplication
.LaunchOptionsKey: Any]?) -> Bool {

FirebaseApp.configure()
Messaging.messaging().delegate = self

// Register for remote notifications. This shows a permission dialog on first run, too

if #available(iOS 10.0, *) {

UNUserNotificationCenter.current().delegate = self
let authOptions: UNAuthorizationOptions = [.alert, .badge, .sound]

UNUserNotificationCenter.current().requestAuthorization(
options: authOptions,
completionHandler: { _, _ **in** }
)

} else {

let settings: UIUserNotificationSettings =

UIUserNotificationSettings(types: [.alert, .badge, .sound], categories: nil)

application.registerUserNotificationSettings(settings)

}

application.registerForRemoteNotifications()

// Get Device Registration token
Messaging.messaging().token { token, error **in**
if let error = error {

print("Error fetching FCM registration token: \(error)")

} else if let token = token {

print("FCM registration token: \(token)")
self.fcmRegTokenMessage.text  = "Remote FCM registration token: \(token)"
}

}

return  true
}
For more details and a comprehensive Firebase Messaging implementation, please check out the Firebase iOS quickstart app.
Flutter
Please follow this guide on how to set up a Flutter app for Firebase services. You also need to enable the Background fetch and Remote notifications background execution modes.
From the root project, run the command flutter pub add firebase_messaging to add the cloud messaging plugin.
You then need to register the device and get an FCM token to send notifications to the user. After that, you can handle notifications received in the foreground as well as in the background. Update the main.dart file with the following code:
1
2
3
4
5
6
7
8
9
10
11
12
13
14
15
16
17
18
19
20
21
22
23
24
25
26
27
28
29
30
31
32
33
34
35
36
import  'package:firebase_core/firebase_core.dart';
import  'package:firebase_messaging/firebase_messaging.dart';

Future<void> main() async {
WidgetsFlutterBinding.ensureInitialized();
await  Firebase.initializeApp();
FirebaseMessaging  messaging = FirebaseMessaging.instance;
final  fcmToken = await  messaging.getToken();
NotificationSettings  settings = await  messaging.requestPermission(
alert: true,
announcement: false,
badge: true,
carPlay: false,
criticalAlert: false,
provisional: false,
sound: true,
);

print('User granted permission: ${settings.authorizationStatus}');

FirebaseMessaging.onMessage.listen((RemoteMessage  message) {

print('Got a message whilst in the foreground!');
print('Message data: ${message.data}');

if (message.notification != null) {
print('Message also contained a notification: ${message.notification}');
}
});

// _firebaseMessagingBackgroundHandler must be a top level function
FirebaseMessaging.onBackgroundMessage(_firebaseMessagingBackgroundHandler);

runApp(const  MyApp());

}
React Native
You need to integrate the Firebase app module before adding cloud messaging.
From the root project, run the commands bash yarn add @react-native-firebase/messaging and pod install in your ios folder.
To show notifications, you have to request permission from the user:
1
2
3
4
5
6
7
8
9
10
11
12
import messaging from '@react-native-firebase/messaging';

async function requestUserPermission() {
  const authStatus = await messaging().requestPermission();
  const enabled =
    authStatus === messaging.AuthorizationStatus.AUTHORIZED ||
    authStatus === messaging.AuthorizationStatus.PROVISIONAL;

  if (enabled) {
    console.log('Authorization status:', authStatus);
  }
}
To listen to foreground messages, add the following code to your App.js file:
1
2
3
4
5
6
7
8
9
10
11
12
13
import React, { useEffect } from 'react';
import { Alert } from 'react-native';
import messaging from '@react-native-firebase/messaging';

function App() {
  useEffect(() => {
    const unsubscribe = messaging().onMessage(async remoteMessage => {
      Alert.alert('A new FCM message arrived!', JSON.stringify(remoteMessage));
    });

    return unsubscribe;
  }, []);
}
To listen for background messages, you need to set up a background callback handler outside of your application logic. To achieve this, update your index.js file as follows:
1
2
3
4
5
6
7
8
9
10
import { AppRegistry } from 'react-native';
import messaging from '@react-native-firebase/messaging';
import App from './App';

// Register background handler
messaging().setBackgroundMessageHandler(async remoteMessage => {
  console.log('Message handled in the background!', remoteMessage);
});

AppRegistry.registerComponent('app', () => App);
Multichannel Push Notifications with Courier
Courier supports multiple push providers, giving you the power to use any or all of them to send notifications to your users' devices via a single API. Courier supports APNs, Firebase Cloud Messaging, Expo, OneSignal Push, and Airship.
Pros and Cons of Courier
Whichever notification provider you implement in your application, Courier enables you to design and send push notifications from a central platform through its Automation Designer, REST APIs, and client libraries.
However, the Courier layout can be a little challenging to understand at first. Courier offers many services with multiple options, and figuring out how to maneuver the layout to achieve a specific goal is not always obvious.
How to Implement Courier
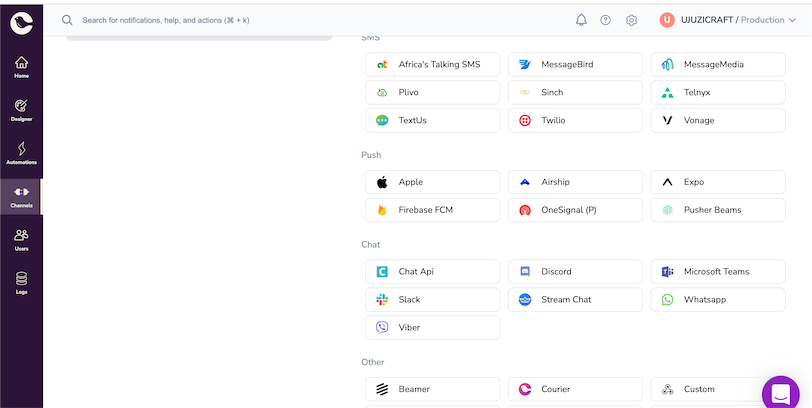
To get started with Courier, you need to sign up for a free account. Once you have an account up and running, you need to configure a push notification provider.
Select the Channels option on the left pane and find the listed push notification providers. Here, you can choose the ones you need and follow the setup guide for each. For this guide, select the Firebase FCM provider:
There are multiple ways to send push notifications to your users with Courier. One option is with the Notification Designer. Select the Designer tab on the left pane, then click the Create Notification button.
You should see an interface like the one in the screenshot below:
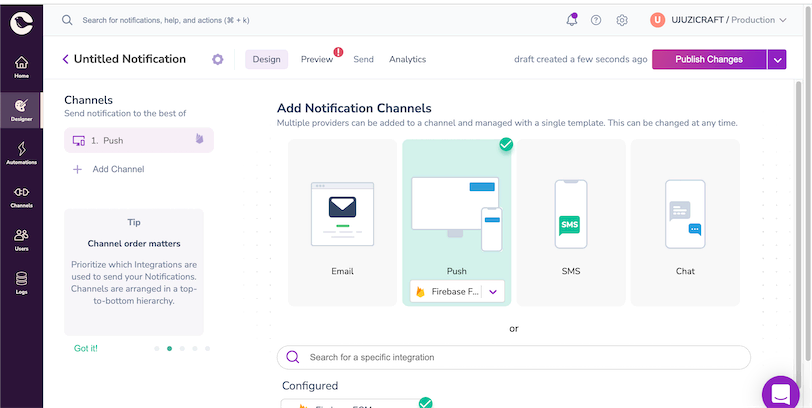
Select a Push channel with Firebase as the provider.
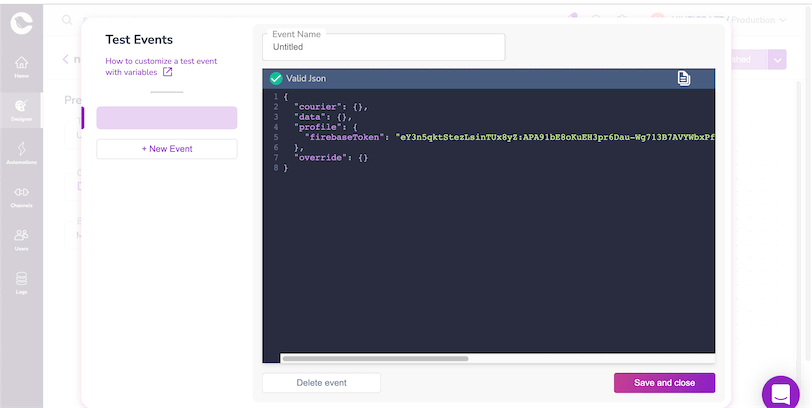
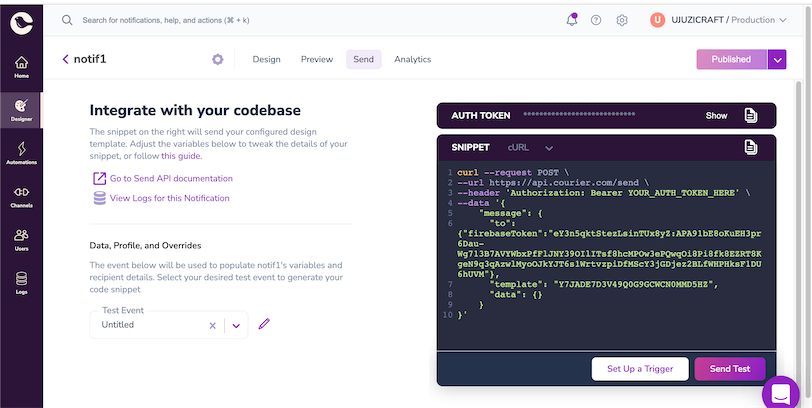
After designing your notification, click the Preview tab on the top bar and create a new test event. You need an FCM token from a user, which is generated after integrating FCM as detailed in the previous section.
After that, click the Send tab on the top bar and press the Publish button to finalize your request. Here, you can send the request using Curl or any of Courier's language-specific implementations such as PHP and Go.
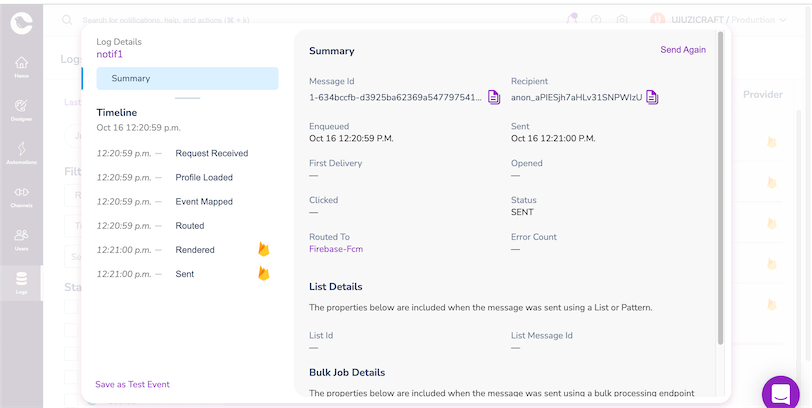
To view the status of your notification request, navigate to the Logs section from the left panel to see a list of your sent notifications and their status. Select any of the listed notifications to view more details:
To send notifications from your code, you can integrate various language-specific Courier SDKs depending on your needs and implementation.
For instance, below is a simple PHP SDK implementation that can be used to send a notification to a user's device:
1
2
3
4
5
6
7
8
9
10
11
12
13
14
15
16
17
18
# Install Courier SDK: pip install trycourier
from trycourier import Courier

client = Courier(auth_token="YOUR_AUTH_TOKEN_HERE")
resp = client.send_message(
  message={
    "to": {
      "firebaseToken": "FIREBASE_TOKEN_HERE",
    },

    # A notification template id from Courier Design Studio.
    "template": "RNRNTVZ1WK44PQKJXQ45062P4B42",
    "data": {
    },
  }
)

print(resp['requestId'])
Conclusion
Push notifications are a good way to keep your users highly engaged and notify them of important actions happening in the app. With multiple providers dominating this space, it can be hard for a developer to choose one that fully satisfies their needs. However, with Courier, developers don't have to choose and can use one or multiple supported providers at once. This ensures their push notification services are active even if one provider is experiencing downtime.
Author: Dedan Ndungu