SMS notifications are widely used in modern web and mobile applications. Applications can engage with users programmatically to facilitate fundamental user interactions in your app, such as two-factor authentication, approval requests, password resets, billing alerts, user phone number verification, etc.
You can use an SMS API as a simple way to programmatically send an SMS from your application. When using SMS for a notification-related use case, developers will often pair an SMS API with a Notification API to handle things like user preferences, template management, multi-touch and multi-channel workflows, and advanced delivery logic like batching frequent messages, scheduling, pre-configured delays, and throttling.
There are multiple options available, and this article will discuss four different ways of sending SMSs with Node.js to help you decide which option is best for your needs.
1. Using Twilio API
Twilio's Programmable SMS API allows you to integrate powerful messaging capabilities into your apps with Node.js. You can send and receive SMS messages, track their delivery, schedule SMS messages to transmit at a later time, and access and edit message history using this REST API.
Note that the prerequisites and example below just shows the basics of interacting with the Twilio API. For a typical production notifications use case, you would use Twilio with Courier's notification platform to support workflow automation, user preference management, audience profiles, template design and management, advanced send logic, and more. . Here is a tutorial for using Twilio with Courier’s Node.js SDK.
As prerequisites to use Twilio with Node.js, you will need :
- A Twilio account, either free or paid.
- Node.js installed on your machine
- SMS-enabled phone number (you can search for and buy one in the Twilio console).
Twilio uses webhooks to notify your app when events like receiving an SMS message occur. Twilio sends an HTTP request (typically a POST or a GET) to the URL you specified for the webhook when an event happens. The event's information, such as the incoming phone number or the body of an incoming message, will be included in Twilio's request. Some webhooks are just informative, while others expect your web app to respond. You must notify Twilio API to which URL these webhooks are sent in all of these cases.
Advantages of using Twilio SMS API
- Support of multiple programming languages.
- On-demand billing.
- Good documentation and community support.
Disadvantages of using Twilio SMS API
- Not mobile-friendly
- Expensive compared to other APIs.
- Hard to get started without a software development background.
Tutorial: How to send SMS using Twilio SMS API
The following is the base for all URLs in the Twilio documentation.
1
https://api.twilio.com/2010-04-01Sending a text message with the Twilio API is straightforward, requiring ten lines of code roughly.
Twilio simplifies the process by providing a helper library. To begin, use npm to install the twilio-node library from the terminal.
1
npm install twilioNext, create a file (sms.js) and open it in the text editor. Load the twilio-node helper library at the top of the file and use it to create a Twilio REST client. Dotenv is then used to populate your environment variables with your account credentials. You can find the credentials you need for this step in the Twilio Console.
1
2
3
4
5
const twilio = require('twilio');
require('dotenv').config();

const accountSid = process.env.TWILIO_ACCOUNT_SID;
const authToken = process.env.TWILIO_AUTH_TOKEN;
Then all you have to do is start a new Twilio client instance and send an SMS from your Twilio phone number to your phone number. Ensure the phone numbers are replaced with your Twilio and cell phone numbers.
1
2
3
4
5
client.messages.create({
  from: process.env.TWILIO_PHONE_NUMBER,
  to: process.env.CELL_PHONE_NUMBER,
  body: "Send SMS using Twilio Api in Node.js!"
}).then((message) => console.log(message.sid));
Then, by running the following command in the terminal, you can receive the SMS in seconds.
1
run sms.jsLikewise, you can now successfully send some messages with the Twilio Programmable SMS API and the Node.js helper library.
2.Using MessageBird API
MessageBird provides a variety of SMS delivery options. You can, for example, send SMS via email or an API connection. In addition, users can always check the status of their messages because each one is assigned with a unique random ID, allowing users to check the status.
The SMS API has an HTTP, a RESTful endpoint structure, and an access key for API authorization. The request and response payloads are formatted as JSON with UTF-8 encoding and URL encoded values.
As with the example above above, the prerequisites and tutorial below are scoped to the basics of working with the MessageBird API. For most production notifications use cases, you would use MessageBird with Courier’s notification platform to support workflow automation, user preference management, template design and management, audience profiles, and more.
As prerequisites, you should have:
- NodeJS development environment.
- Project directory with the MessageBird SDK (This helper library helps interactions between your Node.js application's code and the MessageBird API)
- MessageBird Account.
Advantages of using MessageBird API
- User-friendly dashboard with features like flow builder.
- Cost-effective pricing.
- Can be easily integrated with native apps.
Disadvantages of using MessageBird API
- Deliverability problems with some phone numbers.
- Lack of plugins.
Tutorial: How to send SMS using MessageBird API
The base URL for all URLs in MessageBird's SMS API documentation is as follows.
1
https://rest.messagebird.com/messagesCreate a file (sms.js) and open it in a text editor as the next step. Then, using require, you can include the MessageBird SDK ().
1
var messagebird = require('messagebird')('YOUR-API-KEY');The SDK only accepts one argument, which is your API key. The string YOUR-API-KEY can then be replaced.
Then you can create a new instance of the MessageBird client via messages.create()and feed it to the originator (the sender), receivers (the phone numbers who will receive the message), and body (the message's content). You can use the number you purchased as the originator. The message's body will be limited to 160 characters; otherwise, it will be divided into many pieces. Make sure to replace the values in the sample code with actual data when testing.
1
2
3
4
5
messagebird.messages.create({
   originator : '31970XXXXXXX',
   recipients : [ '31970YYYYYYY' ],
   body : 'Hello World, I am a text message and I was hatched by Javascript code!'
}
If everything goes properly, you'll get a response; if something goes wrong, you'll get an error response. As shown below, a callback function is used to manage this.
1
2
3
4
5
6
7
8
9
function (err, response) {
    if (err) {
       console.log("ERROR:");
       console.log(err);
   } else {
       console.log("SUCCESS:");
       console.log(response);
   }
});
3. Using Plivo API
Plivo API makes it easier to integrate communications into your code by allowing you to send messages to any phone number using HTTP verbs and standard HTTP status codes. Other use cases include sending alerts and receiving delivery status updates.
Advantages of using Plivo SMS API
- Anyone can easily get started.
- User-friendly UI/UX.
- Seamless customization.
Disadvantages of using Plivo SMS API
- Documentation is a bit challenging to understand.
- Lack of error messages.
Tutorial: How to send SMS using Plivo SMS API
1
https://api.plivo.com/{version}/As with Twilio and MessageBird above, the prerequisites and examples for Plivo focus on the basics of the Plivo API. For building production user notifications, pair Plivo with Courier's platform to automate workflows, manage user preferences, design templates, handle audience profiles, and more.
Prerequisites for Plivo are:
- Plivo account.
- Plivo phone number
- NodeJS development environment.
- Plivo's Node SDK.
To begin, create a new js file (sms.js) and use npm to install Express and the Plivo Node.js SDK.
1
$ npm install express plivoThen you can create a new instance of the Plivo client via messages.create() and feed it the src(the sender id ), dst (the phone numbers who will receive the message), and text (the content of the message).
You can use the Plivo console to replace the auth placeholders with your authentication credentials. Actual phone numbers should be substituted for the placeholders (src and dst). Make sure that it's in E.164 format.
1
2
3
4
5
6
7
8
9
10
11
12
13
14
var plivo = require('plivo');
(function main() {
    'use strict';
    var client = new plivo.Client("<auth_id>", "<auth_token>");
    client.messages.create(
        {
            src: "<sender_id>",
            dst: "<destination_number>",
            text: "Hello, from Node.js!",
        }
    ).then(function (response) {
        console.log(response);
    });
})();
Keeping your credentials in the auth id and auth token environment variables will be much safer. It will allow you to start the client with no arguments, and Plivo will automatically fetch the information from the environment variables.
Finally, save and execute the program to see if you received an SMS on your phone.
1
$ node SMS.jsYou can also keep track of the status of your outbound messages with Plivo. First, you have to send a request to the server endpoint specifying its URL and HTTP method to set up a server endpoint. Then Plivo will call this endpoint with the latest message details as and when the message status changes.
4. Using a Multi-Channel Notification API
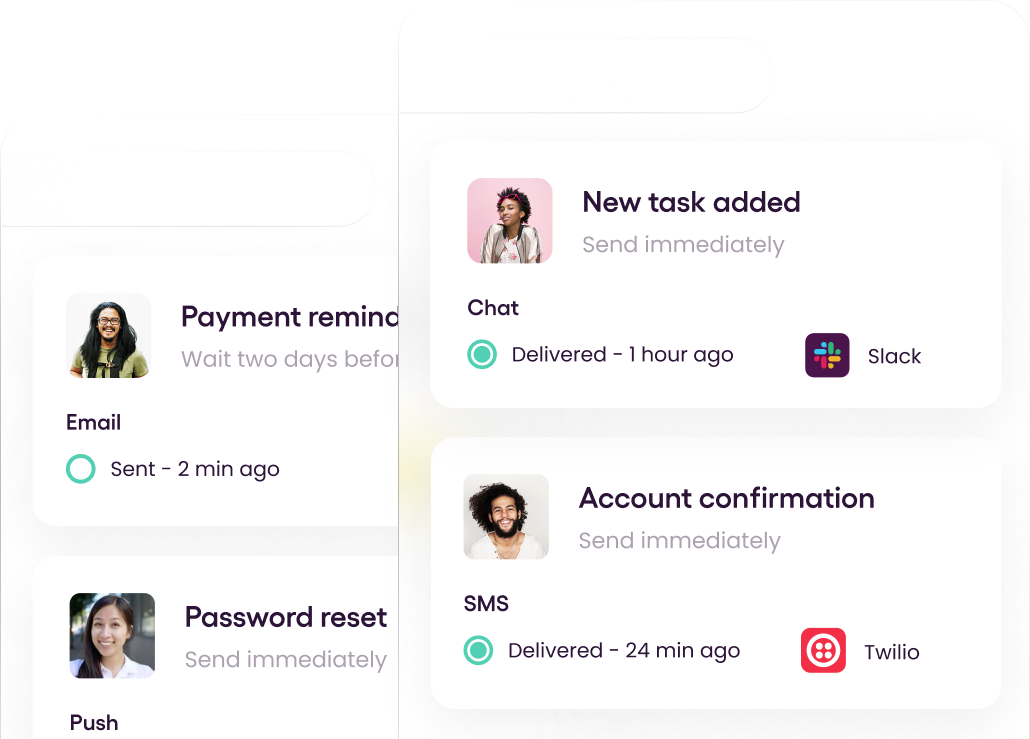
As mentioned in the sections above, it will typically make sense to pair an SMS API with a notification platform like Courier. While SMS APIs remove the difficulty of actually delivering a text message worldwide, a notification platform provides all the other critical logic for building a production notification use case with SMS, or any channel. Some of this logic includes
- Automatic failover between SMS APIs to improve deliverability
- Workflow designer and Automations API for multi-touch notification sequences
- Advanced logic to implement throttling, pre-set delays, cron-based scheduling, and send limits.
- A single Send API endpoint for not just SMS, but also Push, email, an in-app notification center, Slack, Discord, WeChat, and more
- Central logging and reporting for all notification channels
- Internationalization and compliance
Advantages of using a Notification API with an SMS API
- You’ll spend a fraction of the time and resources required to build and maintain a typical production notification use case.
- You can easily add more notification channels like Push, email, and in-app notifications without modifying your code.
- You’ll build a notification system that will scale for the future and support other product teams.
- You aren’t tied to a single SMS API and can change over or add one for failover at any time
- You won't have to manage a large codebase since all channels use the same API.
Disadvantages of using a Notification API
- Takes more time to get started and try out than a simple SMS API REST call.
- May not be appropriate for 2-way SMS messaging use cases
- May not be practical for marketing-focused multicast use cases
Tutorial: How to send SMS using a Notification API
For this demonstration, I will be using Courier since it supports some well-known SMS providers like Twilio, Plivo, MessageBird, etc. Here is a full list of supported channels and providers.
Creating a Courier account
You can easily create a free Courier account using the following link - https://app.courier.com/signup.
Creating a New Channel
After login into the account, you need to create a new channel. For that, select the Channels tab from the Courier dashboard. You will see a list of SMS providers there, and you can select one from the list. For this example, I have selected MessageBird.
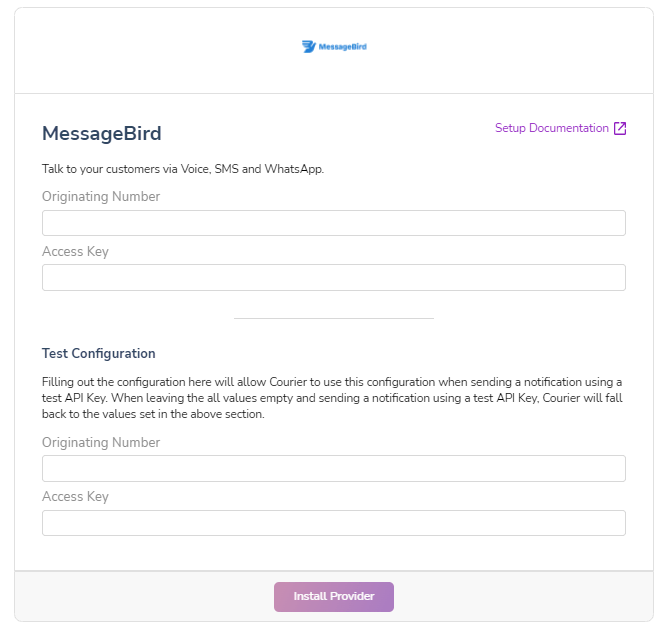
Then, you will be asked to enter an Originating Number and an Access Key. After that, click the Install Provider button.
Creating a Notification
After creating the channel, select the Designer tab from the Courier dashboard and click the Create Notification button. There, select SMS as the channel and MessageBird as the provider.
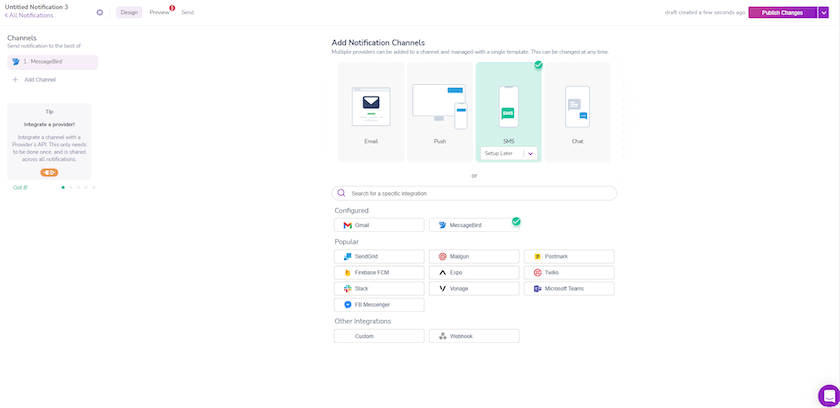
Then, click the Publish Changes button and move to the Preview tab. There, click the Create Test Event button to create a new event.
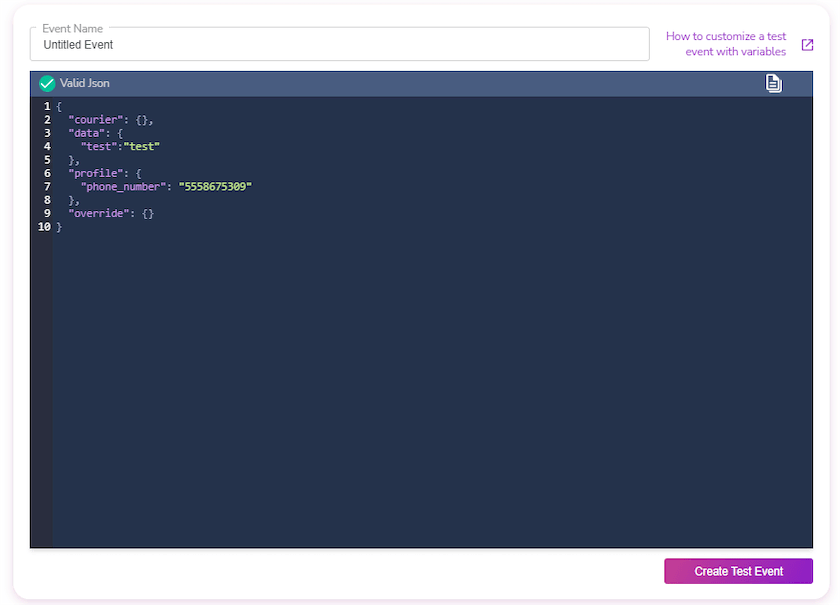
Install Courier SDK
After creating the event, you can find the auto-generated code to configure Courier with your project in the Send tab.
Then, you need to install Courier SDK using the npm install @trycourier/courier command and copy the auto-generated code to your project.
1
2
3
4
5
6
7
8
9
10
11
12
13
14
import { CourierClient } from "@trycourier/courier";
const courier = CourierClient({ authorizationToken: "pk_prod_Y2Y3BK4MAM40YTN029MVR64YFKR0" });

const { requestId } = await courier.send({
  message: {
    to: {
      phone_number: "5558675309",
    },
    template: "NEDRQK62TWM70MHT84S6FKSXM4VT",
    data: {
      test: "test",
    },
  },
});
Note: You can customize the above code based on your requirements. Please refer to Courier documentation for more details.
Conclusion
This article serves as a compilation of four summarized tutorials on how to send SMS using Node.js. With a basic understanding of Node.js, you should be able to choose between the four options above and enhance the functionality of your web or mobile application by sending SMS notifications. Thank you for reading.