Magento, also referred to as Adobe Commerce, is a popular open source e-commerce platform. Magento allows you to build and manage multiple commerce storefronts—business-to-business or business-to-customers—to meet customers' needs. With Magento, you can create and scale various sales channels for your business with ease and reach out to your customers using different languages and in different countries. The estimate that over 700,000 storefronts have been created with Magento is a testament to its wide adoption and popularity in the global e-commerce space as a quick solution for businesses.
The platform was developed with the PHP programming language and uses MySQL for managing its database. Whether you manage a small business or an enterprise, Magento provides you with an extensible open source solution that allows you to implement the core files and integrate with other modules to build your ideal e-commerce platform. Since its acquisition by Adobe Inc. in 2018, the enterprise solution that was built on top of open source code, Magento Commerce, has been rebranded as Adobe Commerce.
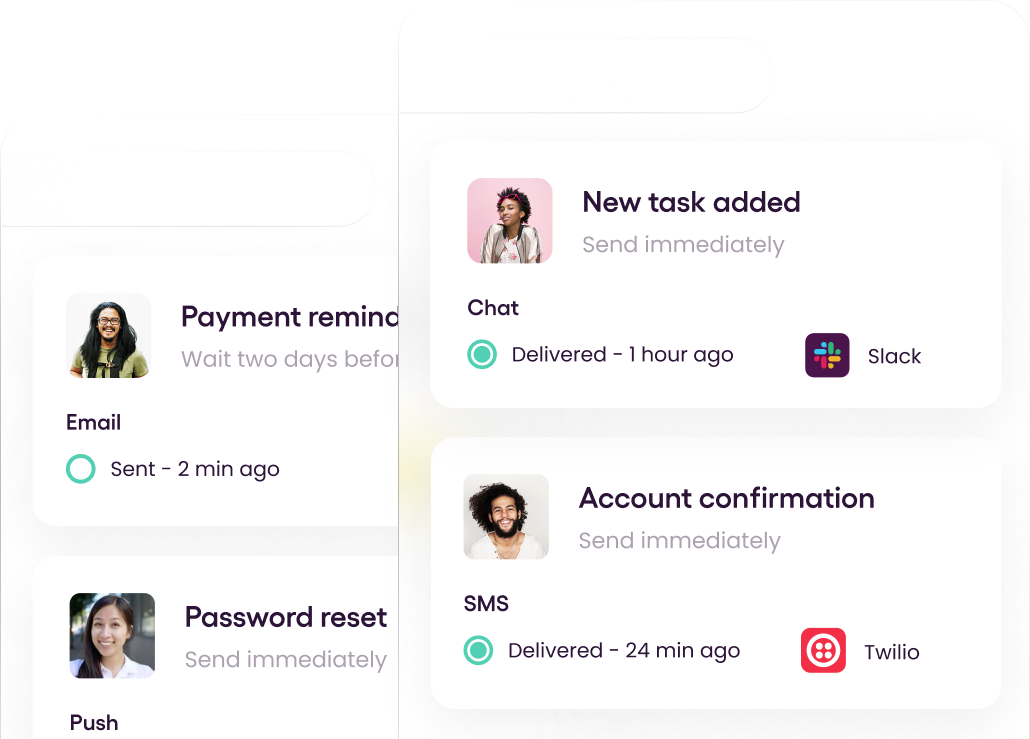
As a Magento developer or user, your primary goal is to increase sales through customer acquisition and retention. You have to create brand awareness by targeting, retargeting, and remarketing to improve customer engagement and, ultimately, sales. A great way to achieve all of this is by simply sending notifications to your customers from your e-commerce website built on Magento. You can easily automate notifications that will activate at important milestones throughout a buyer's journey on your website, such as signing up, placing an order, or checking out. Several tools exist that seamlessly integrate with Magento to enhance your ability to reach out to your customers through different communication channels. A very good example is Courier, which offers a multichannel notifications API for user applications.
In this article, you'll learn how to send email notifications from Magento using Courier. This article will only demonstrate sending notifications when a new order is placed, but you can easily adapt it to other scenarios.
Prerequisites
To follow this tutorial, you'll need a Magento instance with administrator access. Being free and open source, Magento can be installed in various different ways, and the commands in this tutorial will vary slightly based on your Magento setup. It's recommended that you consult the docs of your specific Magento installation wherever necessary. If you don't have a Magento instance, see the Setting Up Magento section to run a local Magento instance with Docker. Otherwise, skip ahead to the Setting Up Courier section.
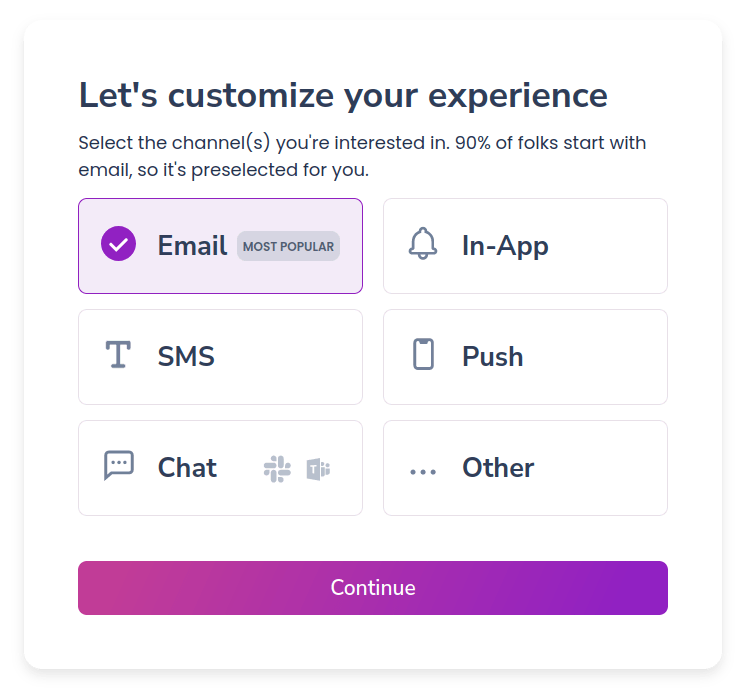
You'll also need a Courier account, which you can get for free. During onboarding, you'll be asked to configure a provider. Select Email from the list and connect a Gmail account that will be used to send the emails:
Setting Up Magento
To create a local Magento instance using Docker, you can use this image. Make sure Docker is installed and that the Docker daemon is running.
You'll also need to create a Magento Marketplace account and get your authentication keys.
Run the following commands, and when prompted to authenticate with Magento Marketplace, use the public key as your username and the private key as your password:
1
2
3
mkdir magento-courier-demo
cd $_
curl -s https://raw.githubusercontent.com/markshust/docker-magento/master/lib/onelinesetup | bash -s -- magento.test 2.4.5
Note that you'll be asked for superuser access to modify the /etc/hosts file to add magento.test as a hostname.
Now, install sample data to populate Magento with some dummy information that will make it easier to test:
1
2
bin/magento sampledata:deploy
bin/magento setup:upgrade
You can now visit https://magento.test to access the Magento instance. The admin portal is accessible at https://magento.test/admin with the following credentials:
- username:
john.smith - password:
password123
When you're logging in for the first time, you'll be asked to set up two-factor authentication. You can use an app like Google Authenticator for that.
Setting Up Courier
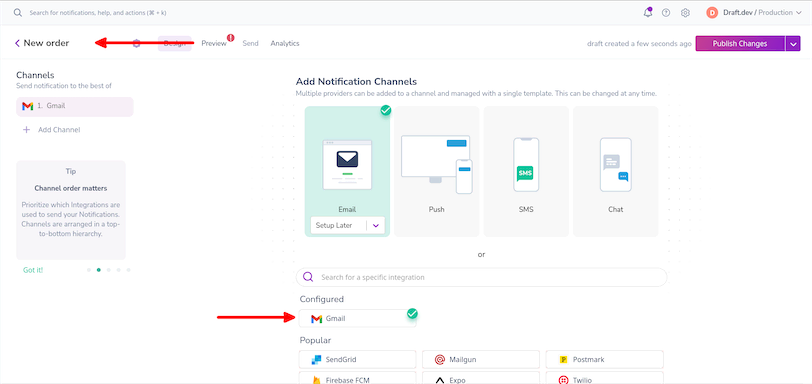
The next step is to design a notification in Courier. In your Courier dashboard, go to the Designer in the left-hand navigation, then click the Create Notification button. This will open a page where you can configure the notification.
Change the notification name to something that's easy to recognize, such as "New order," then select your configured email provider from the list of providers to add it to the Channels list in the sidebar:
Click the newly added provider name in the sidebar, which will open the designer where you can edit the content of the email. By default, you'll have a blank template:
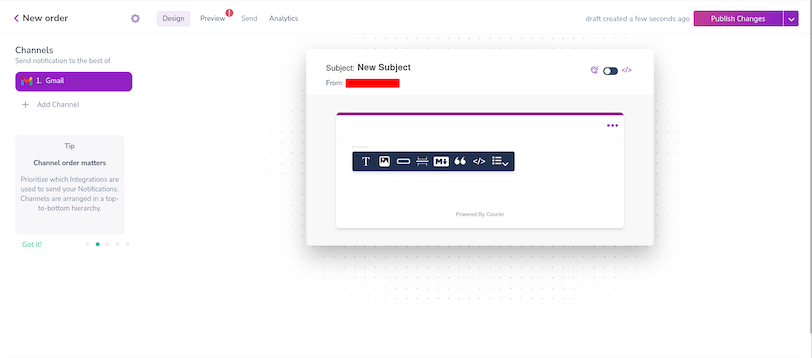
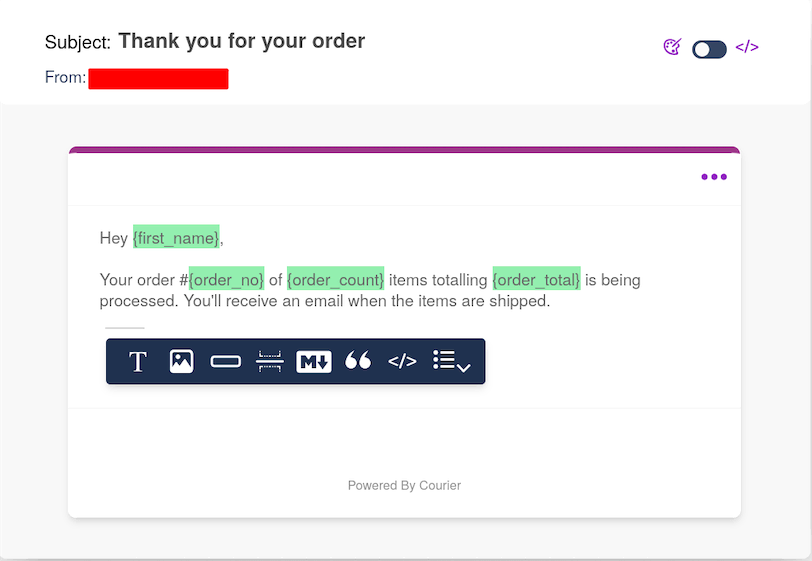
Change the subject of the email to "Thank you for your order," then add a new text block in the body and type the following:
1
2
3
Hey {first_name},

Your order #{order_no} of {order_count} items totalling {order_total} is being processed. You'll receive an email when the items are shipped.
The names enclosed in the curly braces denote variables. In this example, there are four variables: first_name, order_no, order_count, and order_total. The values of these variables will be provided by Magento and will be substituted in the email body. Feel free to add more variables as you see fit.
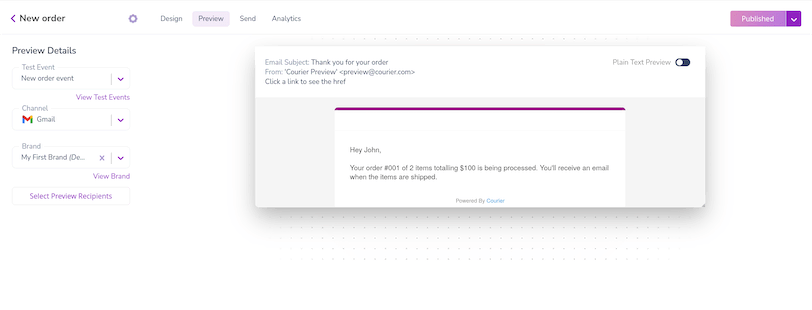
Click Publish Changes and navigate to the Preview tab. To preview your notification, you need to create a test event. Click Create Test Event. In the dialog that opens, name the test event something like "New order event" and paste the following in the JSON field:
1
2
3
4
5
6
7
8
9
10
11
12
13
{
  "courier": {},
  "data": {
    "first_name": "John",
    "order_no": "001",
    "order_count": "2",
    "order_total": "$100"
  },
  "profile": {
    "email": "YOUR_EMAIL_ID"
  },
  "override": {}
}
Replace YOUR_EMAIL_ID above with the email where you want to send the test notification, then save and close the dialog. A preview of the email will be generated and shown to you:
Move over to the Send tab, which is where the magic happens. You'll notice that Courier generates a cURL snippet for you with the data from the newly created test event. Take note of the auth token and the template ID, as you'll need these later:

Click the Send Test button and an email should arrive in your mailbox.
If everything looks good, you can move on to the next step.
Configuring Magento
To integrate with Courier, you need to send HTTP requests to the Courier API endpoints. Whenever an interesting event occurs (such as when a new order is placed, a new shipment is created, or a cart is abandoned), an HTTP call to Courier will trigger the notifications. To automate this process, you'll be using this free and open source extension. It equips Magento with webhooks that send API requests to preconfigured endpoints whenever certain events occur.
If you're using the local Magento instance, run the following commands to install the extension:
1
2
bin/composer require mageplaza/module-webhook
bin/magento setup:upgrade
If you're using a different Magento instance, you can follow the installation guide to install the extension. As mentioned before, since there are many ways of setting up Magento, the exact steps to install an extension varies. It's recommended to consult the docs for your particular Magento instance to figure out how to install extensions.
Once the extension is installed, go to Stores > Configuration in the Magento admin panel. Find the Mageplaza Extensions section in the left sidebar and select the Webhook menu item to access the settings for the webhook extension, which should be enabled by default. If not, enable it by selecting Yes in the Enable field. The other interesting field here is the Abandoned Cart After field, which sets the time in hours after which a cart is considered abandoned. This is useful if you want to send a notification when a customer abandons their cart.
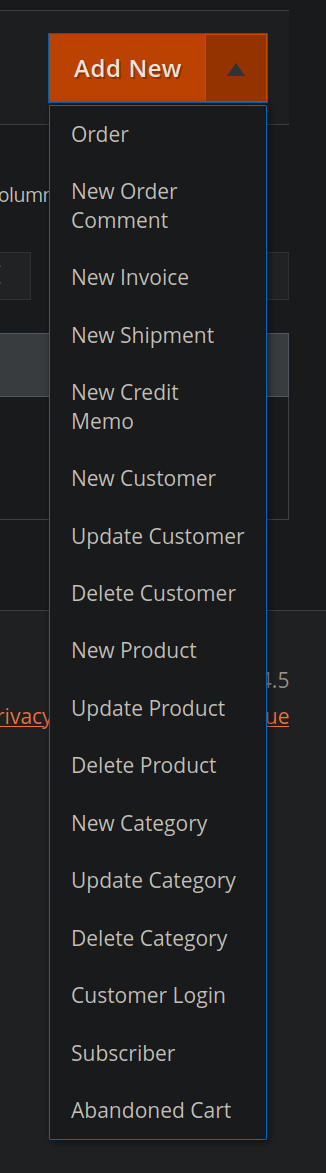
Now, create the webhook that will trigger when a new order is placed. Go to System > Webhook > Manage Hooks. Accessing the dropdown menu next to the Add New button will give you a list of events that can trigger a webhook. Select Order from the list:
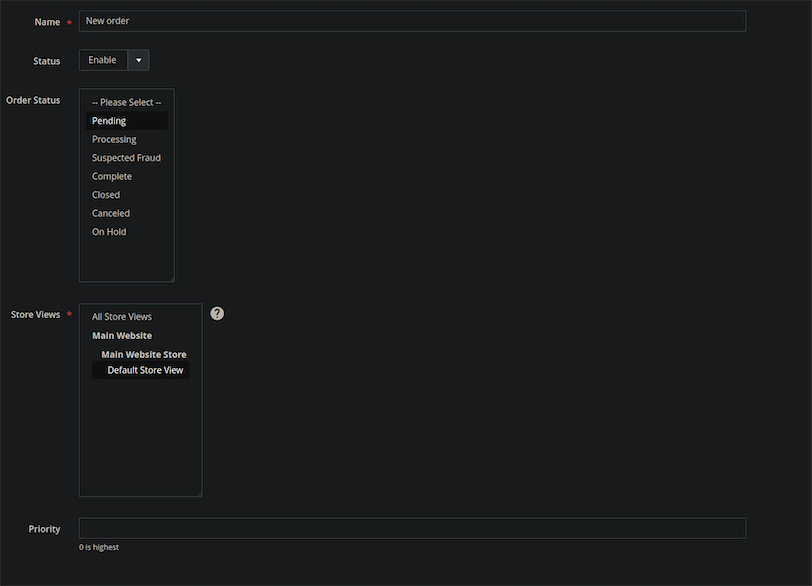
Give a name to the new webhook, like "New order." Select Pending for the Order Status field. When a new order is placed, it has a "pending" status, which will trigger this webhook. Select Default Store View from the Store Views list, then move to the Actions tab.
The Actions tab is where the actual logic is set up.
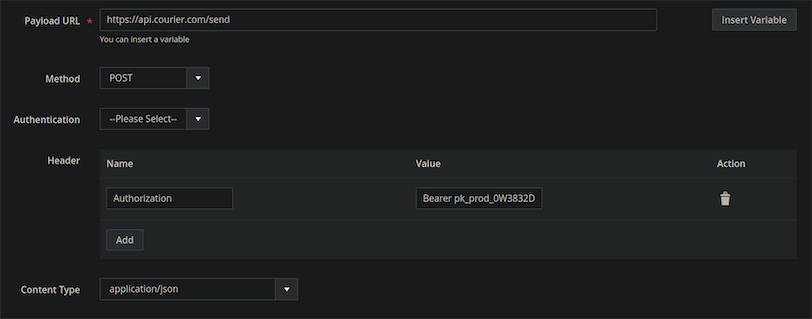
In the Payload URL field, enter https://api.courier.com/send. Select POST as the Method. In the Header section, add a new header. Enter Authorization as the name and Bearer YOUR_COURIER_TOKEN for the value, replacing YOUR_COURIER_TOKEN with the auth token you got from Courier. Finally, select application/json as the Content Type.
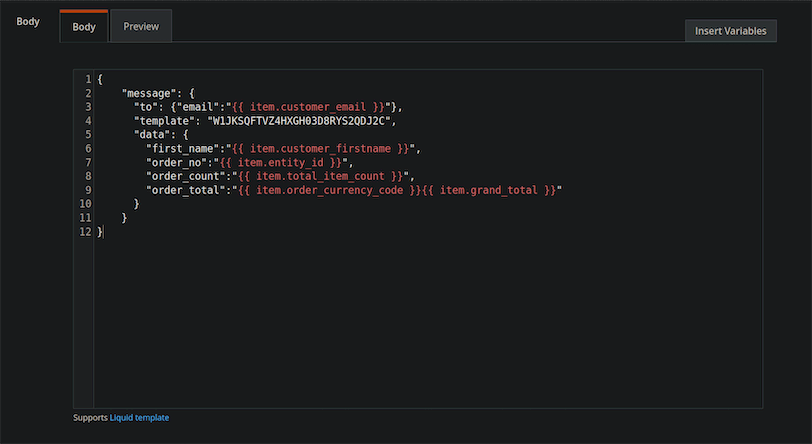
Paste the following JSON in the Body area and replace YOUR_TEMPLATE_ID with the template ID you got from Courier:
1
2
3
4
5
6
7
8
9
10
11
12
{
    "message": {
      "to": {"email":"{{ item.customer_email }}"},
      "template": "YOUR_TEMPLATE_ID",
      "data": {
        "first_name":"{{ item.customer_firstname }}",
        "order_no":"{{ item.entity_id }}",
        "order_count":"{{ item.total_item_count }}",
        "order_total":"{{ item.order_currency_code }}{{ item.grand_total }}"
      }
    }
}
Here, the values enclosed in double curly braces are variables, which will be populated by Magento. You can click Insert Variables to get a list of all the available variables and insert them in the body in case your notification requires them.
Finally, save the webhook. Your setup is now ready!
Testing
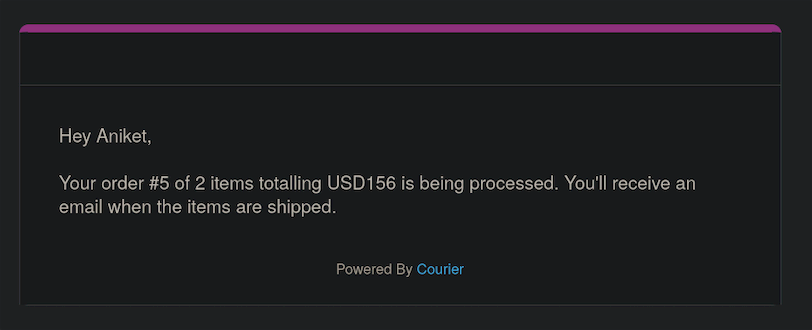
To test the setup, your Magento store must have a few products and a customer with a valid email address. If you're following along with the local Magento install, visit https://magento.test/customer/account/create/ to create a new customer. Log in with the customer's credentials and add a few items to the cart. When you check out, you will receive the following email notification:
Conclusion
Sending notifications is a vital way to engage and retain customers. You need to notify your users about important events such as new orders, checkouts, items back in stock, and abandoned carts, and Courier makes it simple and straightforward to send notifications from Magento. In this article, you integrated Courier with Magento via webhooks to send email notifications.