Introduction
All customer-centric applications require users to stay informed of application events such as receiving password resets, account confirmation, and payment processing. It takes time for users to see these notifications or never see them if they don't log into the application. Therefore, many developers adopted emails to notify users as they provided a quick, readily accessible channel to create event-driven alerts to notify the users instantly. It helps users stay up-to-date on application events. When building large-scale web applications with PHP, you may require an event-driven notification system to notify your users instantly.
In this article, I will present five ways of sending an email using PHP while addressing the pros and cons of each method.
Pre-requisites to Email Sending
Before getting started, it is essential to know that you can send two kinds of emails to your users - Templated and Plain Text (Textual) Emails.
Templated Emails vs. Plain Text Emails
A templated email uses HTML and CSS styling to make it look appealing to users.
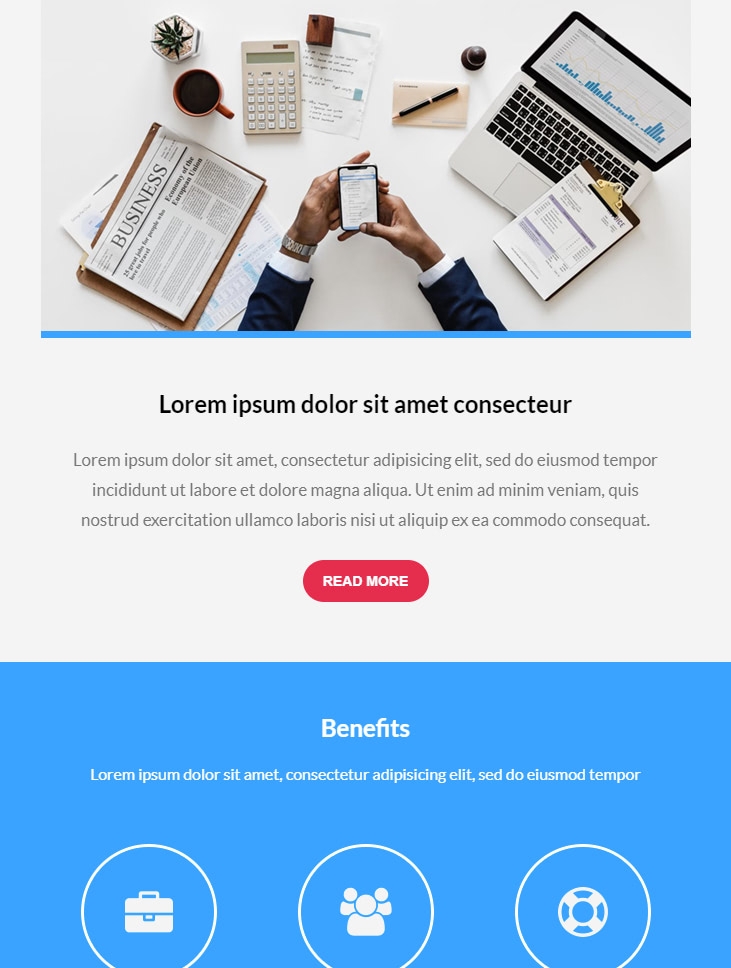
Figure 01 - Templated Email
However, if your requirement is only plain text with a minimal body, a simple text email will do the job.
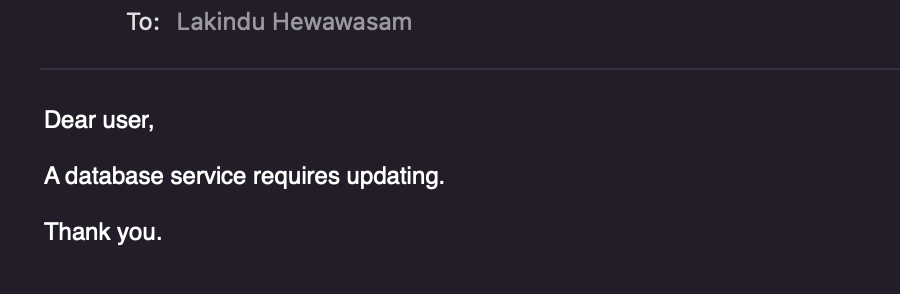
Figure 02 - Plain Text Email
After deciding the type of email you want to send, you can use any of the five ways elaborated below to send an email from your PHP application.
1. Sending an email using the PHP Web Server
PHP offers to send emails directly from the hosted web server by providing an inbuilt function mail().
There are pros and cons to using the inbuilt mail() function. Let us look at this in detail.
Pros
- It is very straightforward to use as it requires calling one function with the required parameters.
- It is in-built with PHP, so it provides tight integration to the PHP ecosystem that ensures plug-and-play compatibility across PHP Frameworks.
- It helps send internal text-based emails easily.
Cons
- It has no support for email attachments.
- It does not support external SMTP Authentication or DKIM signatures. It may cause your emails to be flagged as spam by your recipient email clients.
- It is not suitable for many users' event-driven alerts as it opens and closes one SMTP Socket Connection per email. Therefore, bulk emails are inefficient.
Demonstration
However, if you feel like mail() suits your needs, look at the code shown below to send an email using mail().
1
2
3
<?php
  mail($to_email_address,$subject,$message,[$headers],[$parameters]);
?>
The function shown above is the PHP mail function. As you can see, it accepts five parameters. But you can send an email using the four parameters discussed below.
$to_email_address: The recipient of the email. This address must be compliant with the RFC-2822 Standards.$subject: The subject of the email.$message: The email body (Text/ HTML). Each line in the email must not exceed 70 characters, and a line must be separated using a new line token (\n).$headers: The headers of the email. The "from" header is mandatory, and the "Content-Type" header is only compulsory when sending a templated email.
Defining the sender email
To add your sender configuration, visit the php.ini file and add your mail server configs, including the sender email address.
Sending the email using mail()
After setting up the php.ini file, sending the email is as simple as shown below.
1
2
3
4
5
6
7
8
9
10
11
12
13
14
15
16
17
18
19
20
21
22
23
24
25
26
27
28
<?php
// update with your recipients
$to = "user1@example.com, user2@example.com";
// update with your email subject
$subject = "This is a test HTML email";

// update with your template requirements
$message = "
<html>
<head>
<title>This is a test HTML email</title>
</head>
<body>
<p>Hello! How are you doing. This is a test email to demonstrate email sending in PHP using the mail() function!</p>
</body>
</html>
";

// From is required - update with your sender
$headers = 'From: <sender@example.com>' . "\r\n";

// The content type is required when sending HTML Based emails.
$headers = "Content-type:text/html;charset=UTF-8" . "\r\n";
$headers = "MIME-Version: 1.0" . "\r\n";

// calling the mail function to send the mail using the hosted web server.
mail($to,$subject,$message,$headers);
?>
2. Sending an Email using PHPMailer (SMTP)
The next option is to use PHPMailer - A third-party email sending library that uses SMTP Authentication.
SMTP stands for Simple Mail Transfer Protocol, and it is widely used in the industry to send emails due to its capability of relaying emails across multiple networks.
Pros
Some significant advantages of using PHPMailer is:
- You require only your SMTP credential information to get started.
- The SMTP provider handles the heavy lifting (header assignment, domain verification).
- PHPMailer supports sending templates emails at ease.
- It does not require you to assign content headers and other email headers. The library takes care of this for you.
Cons
PHPMailer does have its drawbacks. Below are some of its major flaws:
- It is insecure because it uses the standard SMTP protocol, which is susceptible to DDoS Attacks.
- When PHPMailer attempts to send a mail, it has a back and forth communication with the recipient SMTP Server that delays the email.
Demonstration
The code snippets below highlight how you can send an email with Gmail using PHPMailer.
You need to install the library in your PHP project to get started. To do so, run the following composer command shown below.
1
composer require phpmailer/phpmailerAfter successfully installing PHPMailer to the PHP Project, I'll show you how to send a templated email with PHPMailer.
- Import the
PHPMailer,SMTP,ExceptionClasses in your PHP file. ThePHPMailerwill be used to create the class instance,SMTPto manage the connection to the pre-existing SMTP server (for this, I will use Gmail),Exceptionto handle any exception thrown. - Create an instance of
PHPMailerto configure the SMTP connection and send emails. - Declare your SMTP configuration by providing the credentials, port, and host. Please note that it is essential to visit your Gmail account settings and allow less secure devices to communicate with your account if you are using Gmail. It may cause authentication errors when disabled.
- Construct the email message by providing the subject, content, recipients, and sender.
- Send the email using PHPMailer via SMTP.
The code for this is shown below.
1
2
3
4
5
6
7
8
9
10
11
12
13
14
15
16
17
18
19
20
21
22
23
24
25
26
27
28
29
30
31
32
<?php
//Import PHPMailer classes
use PHPMailer\PHPMailer\PHPMailer;
use PHPMailer\PHPMailer\SMTP;
use PHPMailer\PHPMailer\Exception;

//Create an instance of PHPMailer
$mail = new PHPMailer(true); // pass true to enable debugging and handle errors

try {
    $mail->SMTPDebug = SMTP::DEBUG_SERVER; // enable debugging

    $mail->isSMTP(); // use smtp connection to send email

    $mail->Host = 'smtp.gmail.com'; //set up the gmail SMTP host name

    $mail->SMTPAuth = true; // use SMTP Authentication to allow your account to authenticate                                 $mail->Username = '<YOUR-GMAIL-EMAIL-ADDRESS>';                     $mail->Password = '<YOUR-ACCOUNT-PASSWORD>';                               $mail->Port = 587; // set the SMTP port in Gmail

    $mail->SMTPSecure = "tls"; // use TLS when sending the email

    $mail->setFrom('<YOUR-GMAIL-EMAIL>', 'OPTIONAL NAME'); //defining the sender

    $mail->addAddress('<YOUR-RECIPIENT>', 'John Doe');

    // define the HTML Body. (you can refer this from an HTML file too)
    $mail->Body = '<h1>Hello World!</h1> <p>This is my first email!</p>';

    $mail->send(); //send the emailecho 'The email has been sent';
} catch (Exception $e) {
    echo "We ran into an error while sending the email: {$mail->ErrorInfo}";
}
?>
3. Sending an Email using Symfony Mailer (SMTP)
If you develop your web application using PHP Symfony, you can build excellent notification services using the Symfony Mailer. Out of the box, Symfony Mailer utilizes SMTP Authentication, making it easy to connect to external SMTP servers to send your emails.
Pros
Utilizing Symfony Mailer brings you these benefits:
- It is easy to get started with Symfony Mailer as it seamlessly integrates with the Symfony Framework.
- The mailer handles all the heavy lifting while the developer can invoke API methods to send emails.
- It integrates with Twig to provide an efficient way of managing dynamic HTML Templates.
Cons
Using Symfony Mailer has these drawbacks.
- It supports only the Symfony Framework.
- It is slow given that it opens and closes an SMTP Connection for every single email. Therefore, sending bulk transaction emails with Symfony Mailer is not recommended.
Demonstration
Suppose Symfony Mailer suits you better than PHPMailer (given that Symfony Mailer provides an efficient way to handle templates using Twig). In that case, the code snippets below show how you can send an email with Gmail using Symfony Mailer.
An important note is that you must be running a Symfony Project to use Symfony Mailer.
First, allow your Google account to be accessed from less secure devices.
Then, you can install the Symfony Mailer library using Composer with the command below.
1
composer require symfony/mailerThen, you need to add the Gmail SMTP Provider for Symfony using Composer with the command below.
1
composer require symfony/google-mailerAfterward, add your SMTP Configuration in your .env file as shown below.
1
MAILER_DSN=gmail+smtp://user@gmail.com:userPassword@defaultNote: If your password has special characters, ensure that you "URL encode" it to avoid parsing errors.
Hereafter, create an email controller that can be used for sending emails. All emails will be sent using the configuration you provided above.
1
2
3
4
5
6
7
8
9
10
11
12
13
14
15
16
17
18
19
20
21
22
23
24
25
26
27
// src/Controller/EmailController.php
namespace App\Controller;

use Symfony\Bundle\FrameworkBundle\Controller\AbstractController;
use Symfony\Component\HttpFoundation\Response;
use Symfony\Component\Mailer\MailerInterface;
use Symfony\Component\Mime\Email;

class EmailController extends AbstractController
{
    /
     * @Route("/email")
     */public function sendEmail(MailerInterface $mailer): Response{
        try{
          $email = (new Email())
              ->from('configuredEmail@gmail.com')
              ->to('reciever@gmail.com')
              // substitute with twig for template management
              ->html('<p>Sending my First Email with Symfony Mailer</p>');

          $mailer->send($email); // send the mail using Symfony Mail
        }
        catch(Exception e){
          echo 'Error';
        }
    }
}
The snippet above will successfully send the email using Gmail SMTP.
4. Sending an Email using Transactional Email API
Suppose your application has transactions (payment confirmations, account confirmation, password verifications, and receipt distribution) that require automated email sending and email analytics. In that case, an SMTP Authentication approach will not work for you because your application would open and close an SMTP socket connection per email. It is resource-intensive, costly, and ineffective.
In these cases, you can use a Transactional Email API to automatically send your transaction emails programmatically using an API or an SMTP Relay.
There are many transactional email API providers. Two commonly used services are:
- SendGrid
- Amazon SES
Pros
Some advantages of using a transactional email API are:
- Email providers are well known and authorized. Therefore, your emails do not get sent to spam.
- You get access to analytics to monitor email delivery rates view rates.
- They work on "email-as-a-service." Therefore, they can scale up and down to your demands at ease, ensuring minimal downtime.
Cons
However, using transactional email APIs does bring its drawbacks. Some of these drawbacks are:
- The services depend on language support (Some email APIs do not work for specific PHP frameworks)
- These APIs have a high learning curve.
Demonstration
If transactional email APIs are needed, follow this guide to send an email using SendGrid (transactional email API) using PHP.
Firstly, a SendGrid account is required. You can create a free SendGrid account that allows you to send 100 emails per day.
After creating the account, you need to create a verified sender on SendGrid. It helps SendGrid verify the sender.
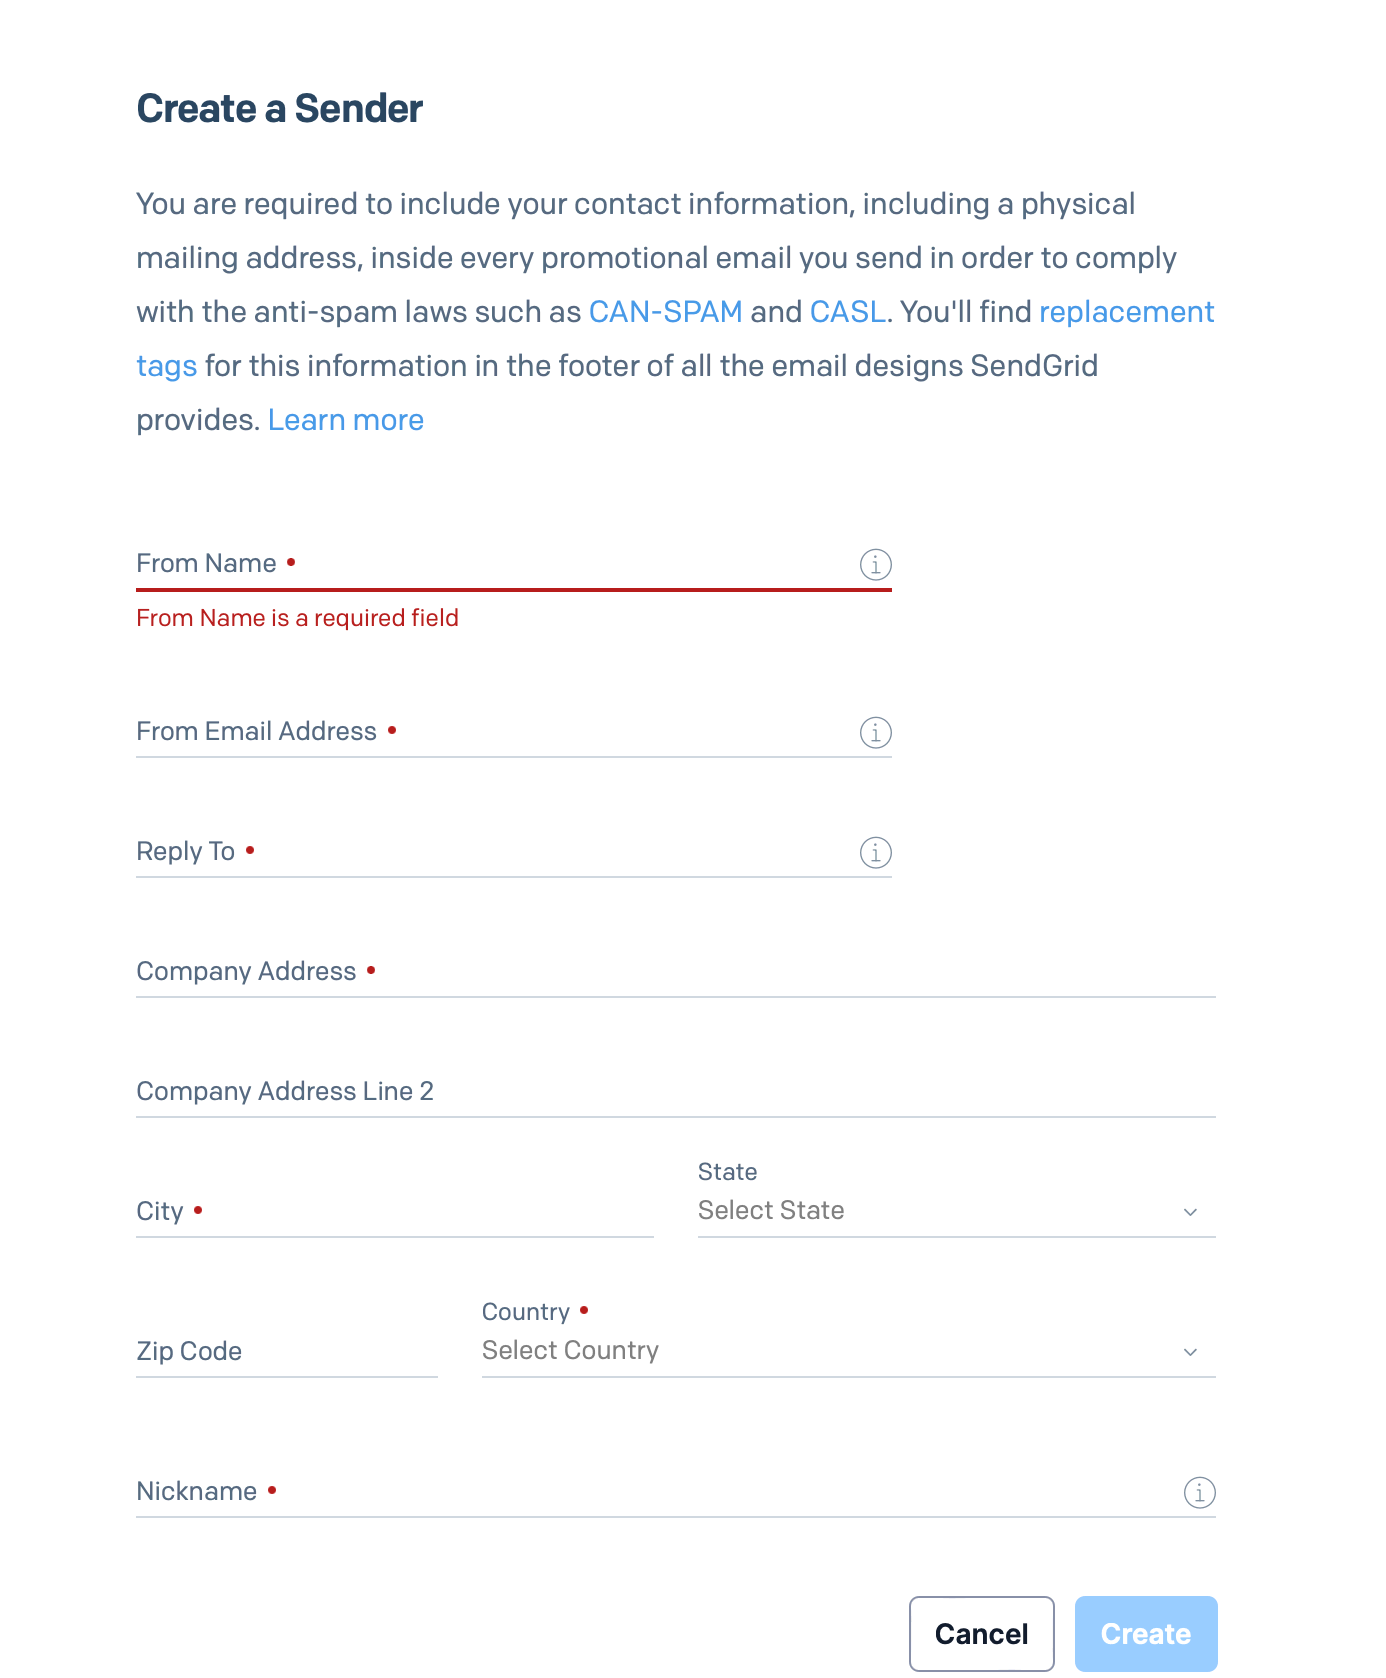
Figure 03 - Creating a Verified Sender on SendGrid
Afterwards, it would be best to create an API Key to communicate with the SendGrid from your PHP application.
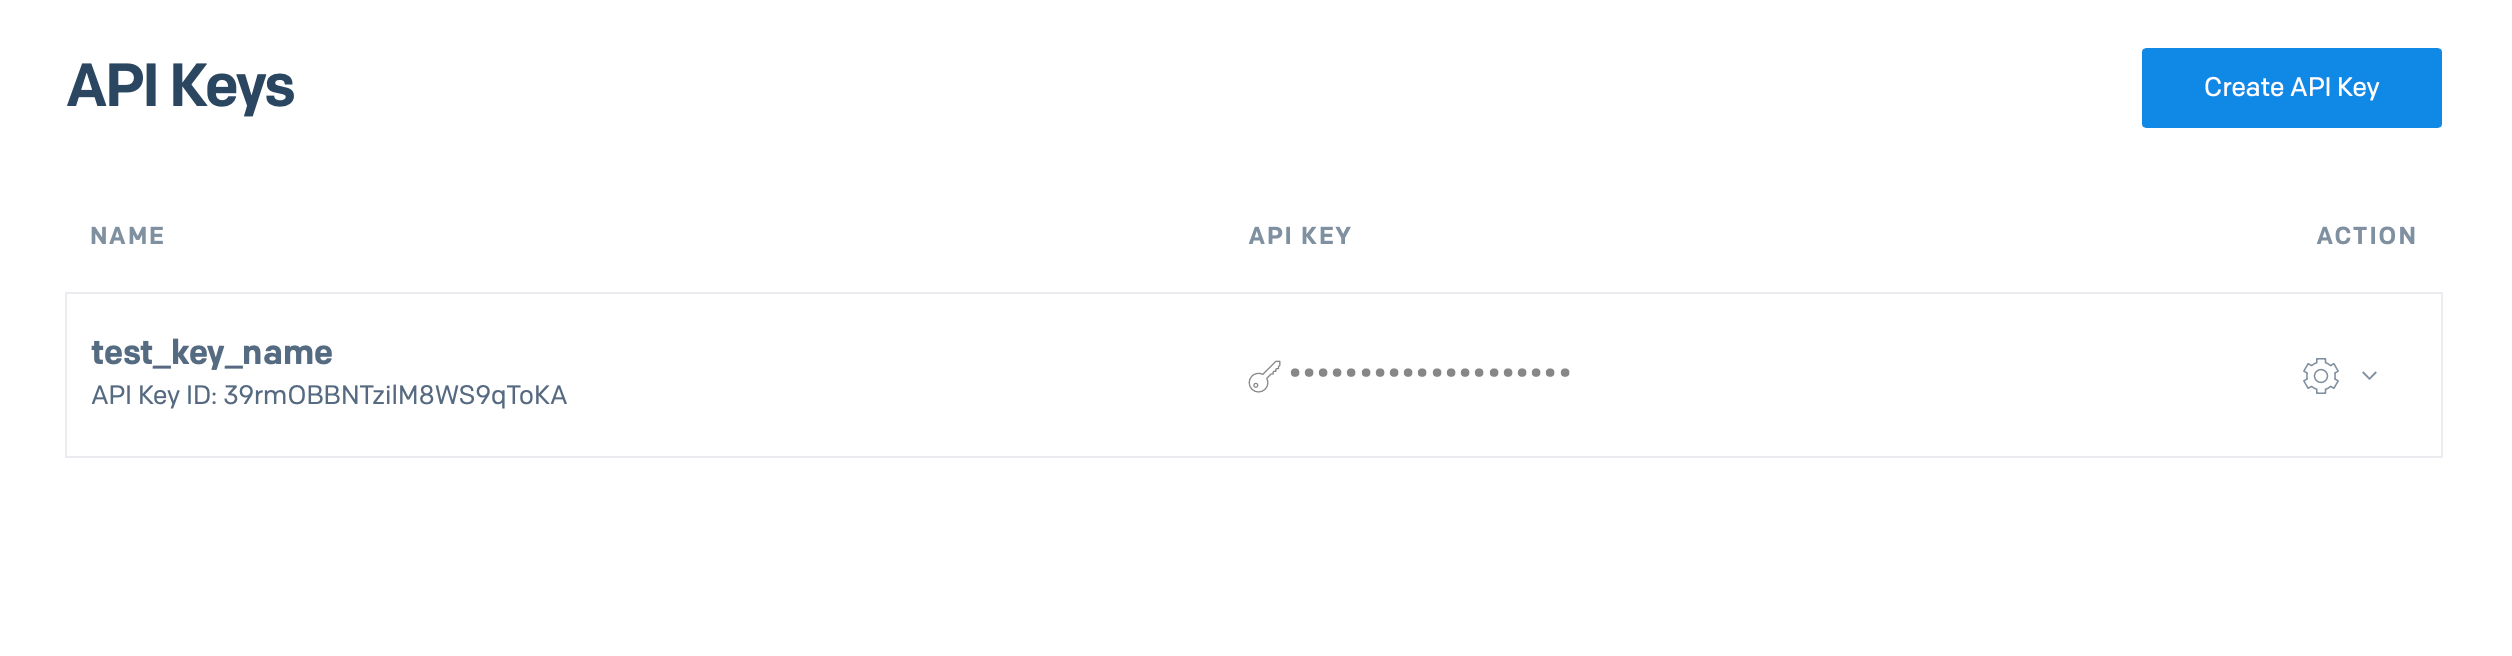
Figure 04 - Creating an API Key in SendGrid
Once the key gets created, add it to your environment variables in your PHP project.
Next, install SendGrid in your PHP project using composer with the command below.
1
composer require sendgrid/sendgridNext, create a new PHP file and add the code shown below.
1
2
3
4
5
6
7
8
9
10
11
12
13
14
15
16
17
18
19
20
21
22
23
24
25
<?php

use SendGrid\Mail\Mail;

$email = new Mail(); // create instance of sengrid mail

// set from (the verified email address you created earlier)
$email->setFrom("your-sender-address@example.com", "Sender Email");
// set the subject of the email
$email->setSubject("Sending email using Transactional Email API");
// set the people recieving this email
$email->addTo("any-recipient@example.com", "Example Recipient");
// use "text/html" to indicate that email is sent using HTML
$email->addContent(
    "text/html", "<strong>Hello World! This is my first transactional email api email</strong>"
);

// create an instance of sendgrid with the API Key to provide gain authorized access
$sendgrid = new \SendGrid(getenv('<YOUR-SENDGRID-API-KEY>'));
try {
    $response = $sendgrid->send($email); // send the email using SendGrid APIprint $response->statusCode() . "\n"; // display email status code
} catch (Exception $e) {
    echo 'Caught exception: '.  $e->getMessage(). "\n";
}
?>
The code shown above will help you send an email using the Transactional Email API. Ensure to replace the API key with yours and the "from" parameter with the email address you verified earlier. If not, there will be exceptions.
To check if the email is sent, visit SendGrid Dashboard and navigate to "your Activity." It provides analytics to monitor if your email is delivered and if recipients opened/ viewed the email.
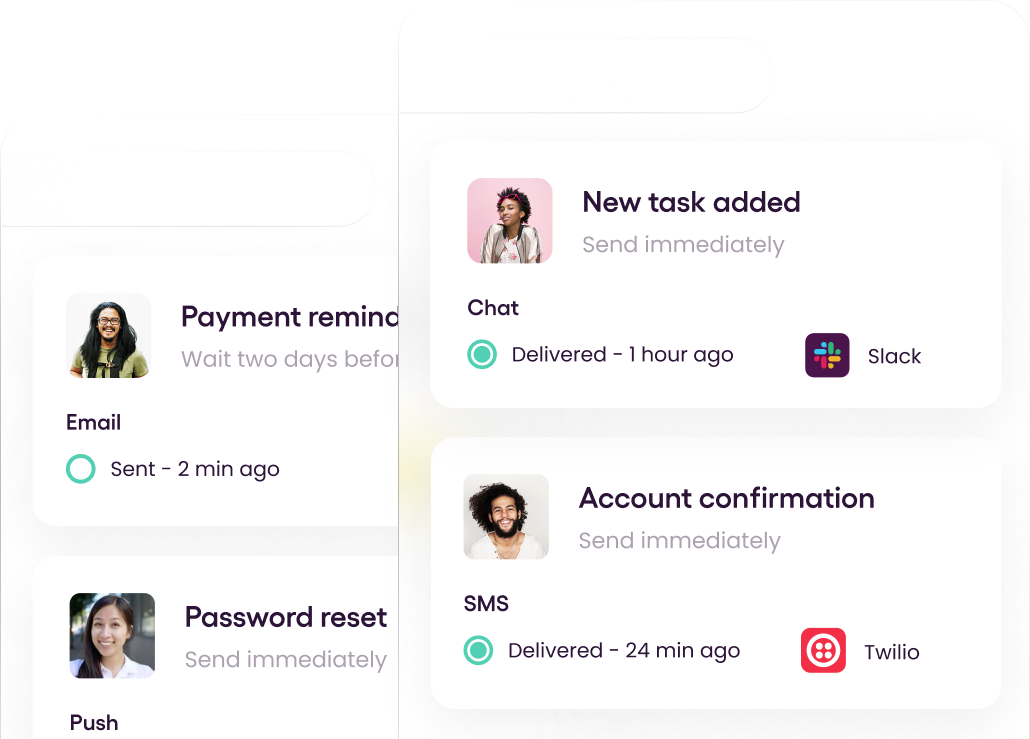
5. Sending an Email using a Multi-Channel Notification Service
If your application needs to notify users across multiple channels such as Emails, SMS, Push Notifications, you may need a multi-channel notification service. Using a multi-channel notification service streamlines your notification flow as it provides you with the capability to configure the required channels and communicate with all of them using one API.
Pros
Therefore, using a multi-channel notification has vital advantages.
- You can notify users across multiple notification channels with one API.
- As all channels require one API, you do not need to maintain a big codebase that helps increase maintainability.
- You can add more notification channels in the future without touching your codebase. Therefore, any non-technical user can manage your notification service.
- It offers analytics for notifications.
Cons
A multi-channel notification service is not all about its positives. Some vital drawbacks of this are:
- It can be costly to consume multiple notification channels.
- You are bounded by the maximum notification count per month (based on the provider).
However, if you require a multi-channel notification service but these cons are holding you back, a cost-effective multi-channel notification service that you can use is Courier.
Courier offers a free plan of 10,000 emails per month and even provides you the capability of using your Email Service Provider. Additionally, it integrates seamlessly with popular transactional email APIs such as SendGrid and Amazon SES, allowing you to manage your multi-channel notification workflow effectively. Furthermore, Courier provides you with an easy setup process to help you configure your application to send emails using Gmail in minutes!
Therefore, I recommend using Courier in your PHP web applications to build a multi-channel notification service.
Demonstration
If you decide to integrate Courier, you can follow the steps discussed below to send an email via Gmail using Courier.
To start, you will need a Courier account. Therefore follow this link to sign up for a free account - https://app.courier.com/signup.
After creating your account, let us create a notification. In your Courier dashboard, select the Designer and create a notification. You should see the output shown below.
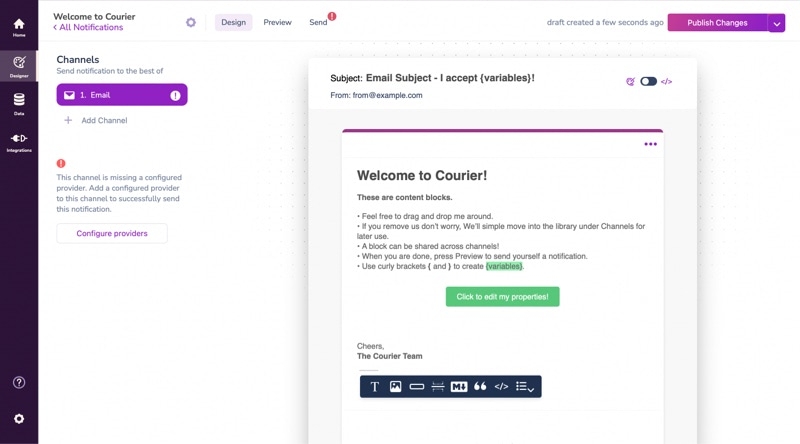
Figure 05 - Creating a notification in Courier
Next, you will need to configure providers. For this, we will select Gmail.
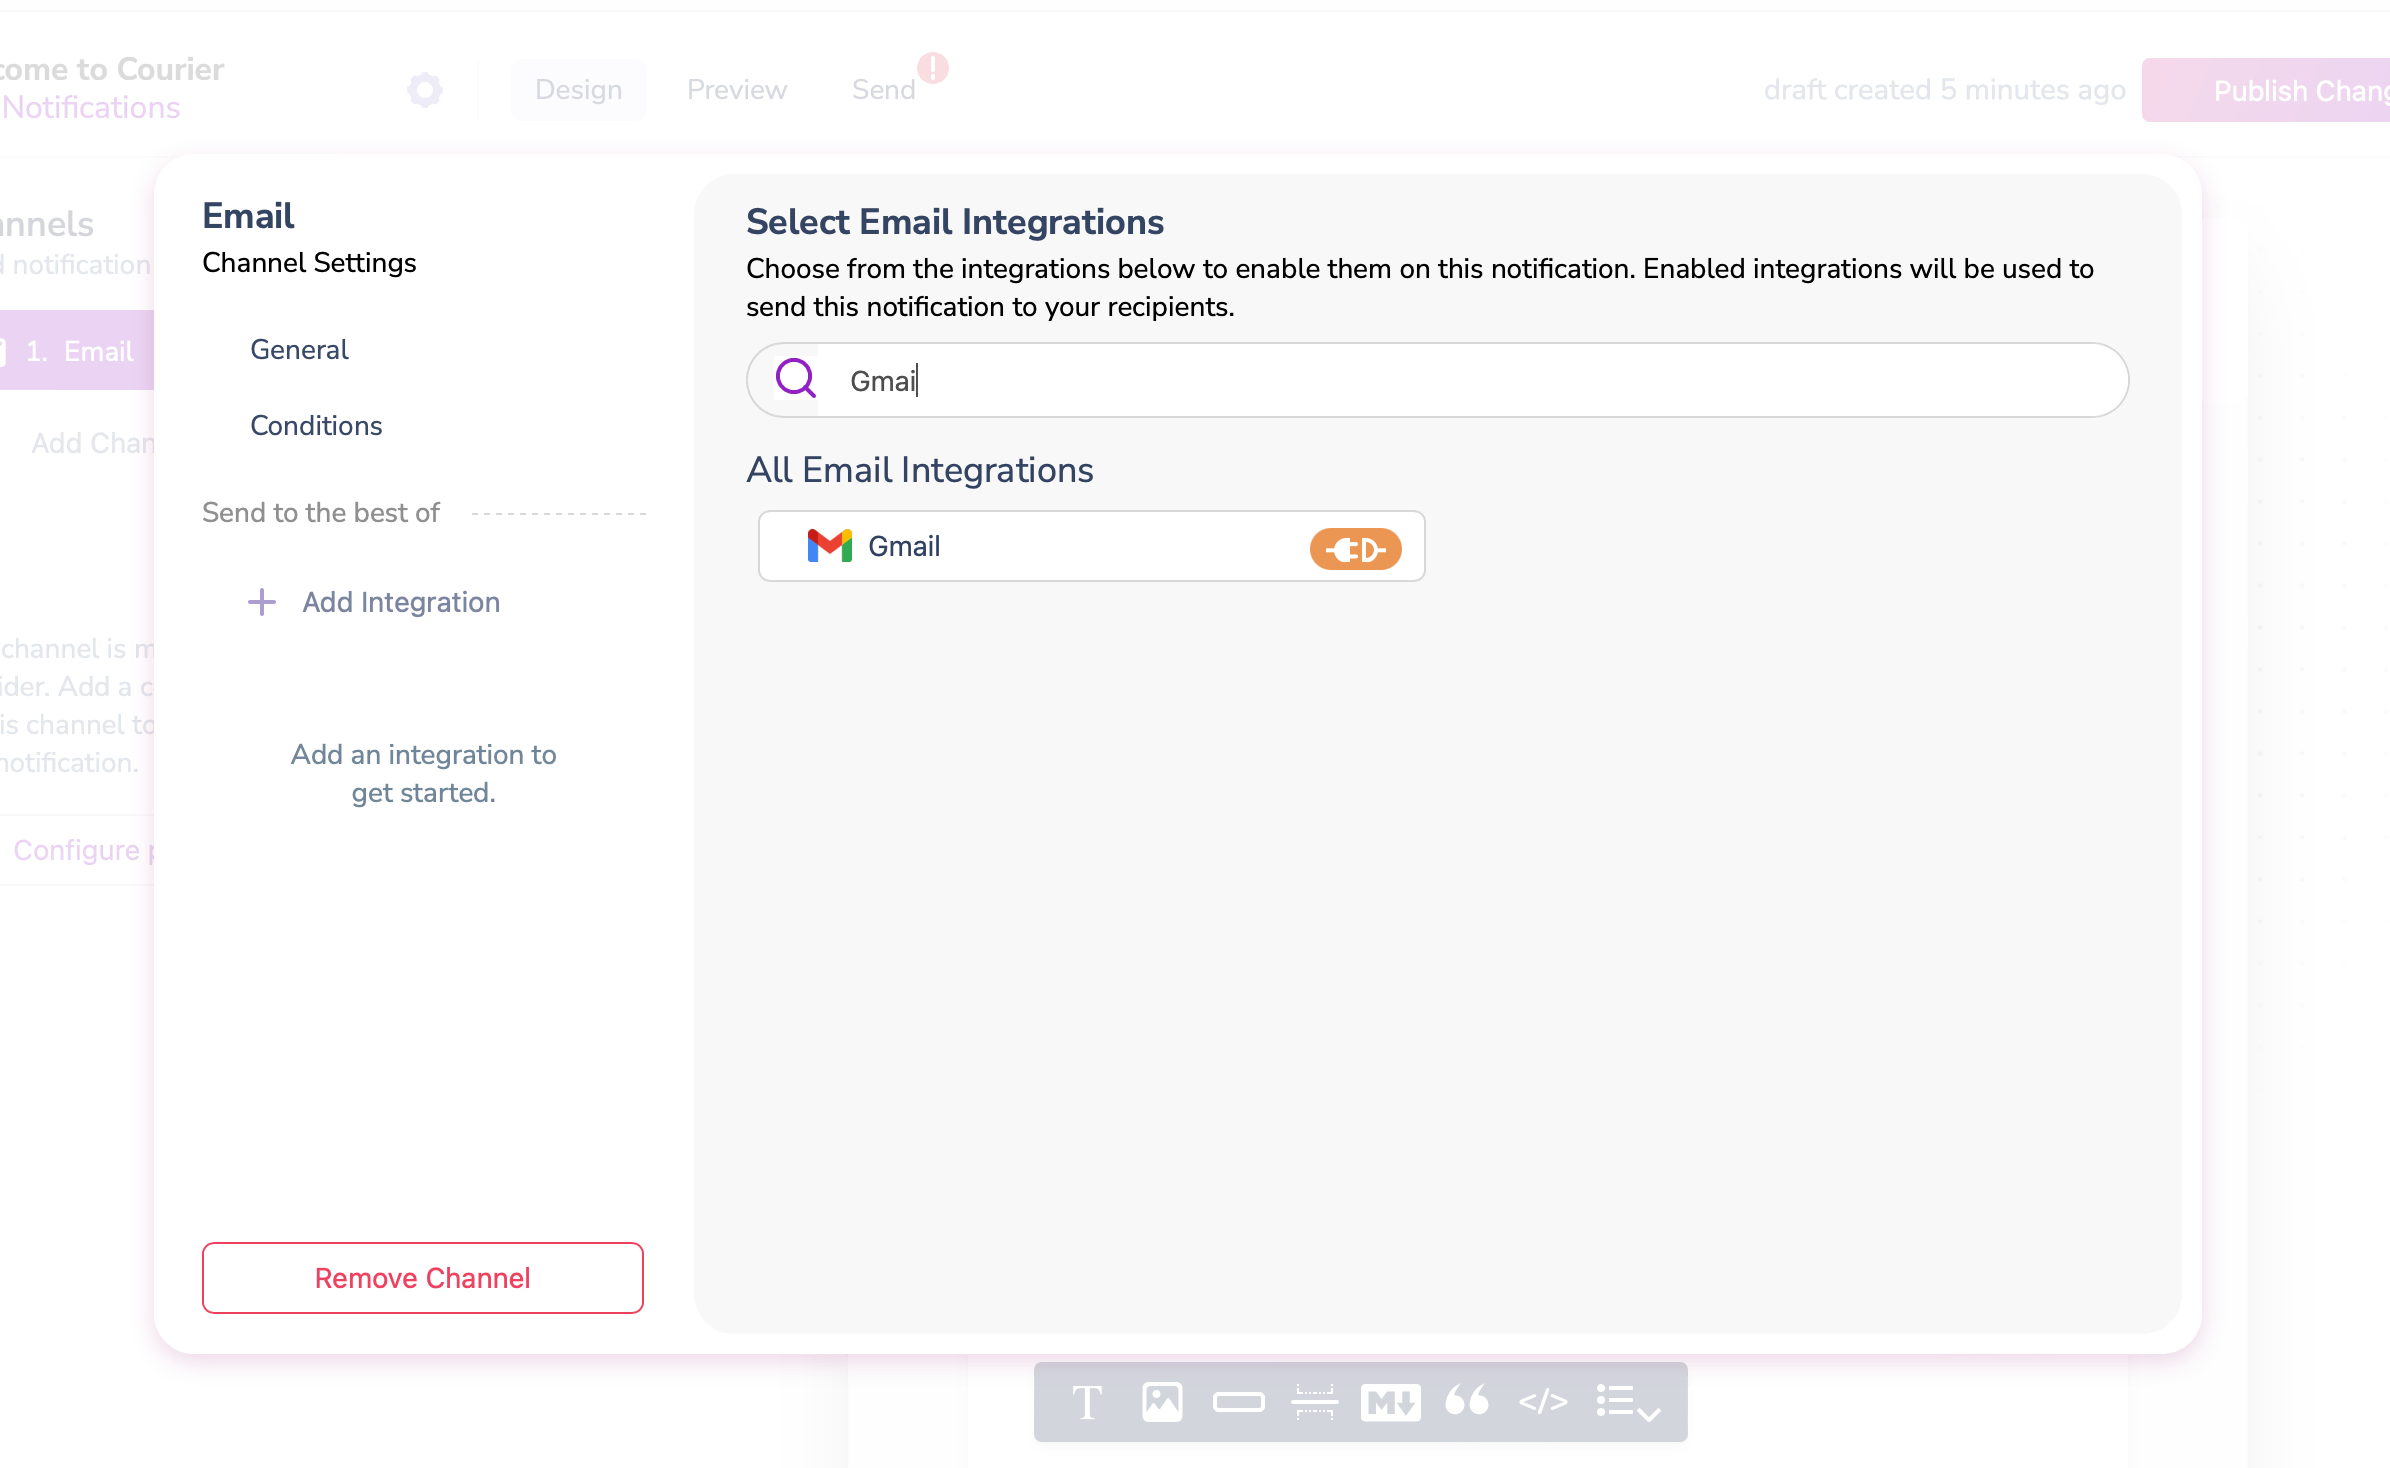
Figure 06 - Adding Gmail as your notification provider
After adding the provider for the notification, continue creating your template with your preferences. You can add a logo, code block, bullet lists and attach dynamic data to it by accessing the template toolbar as below.
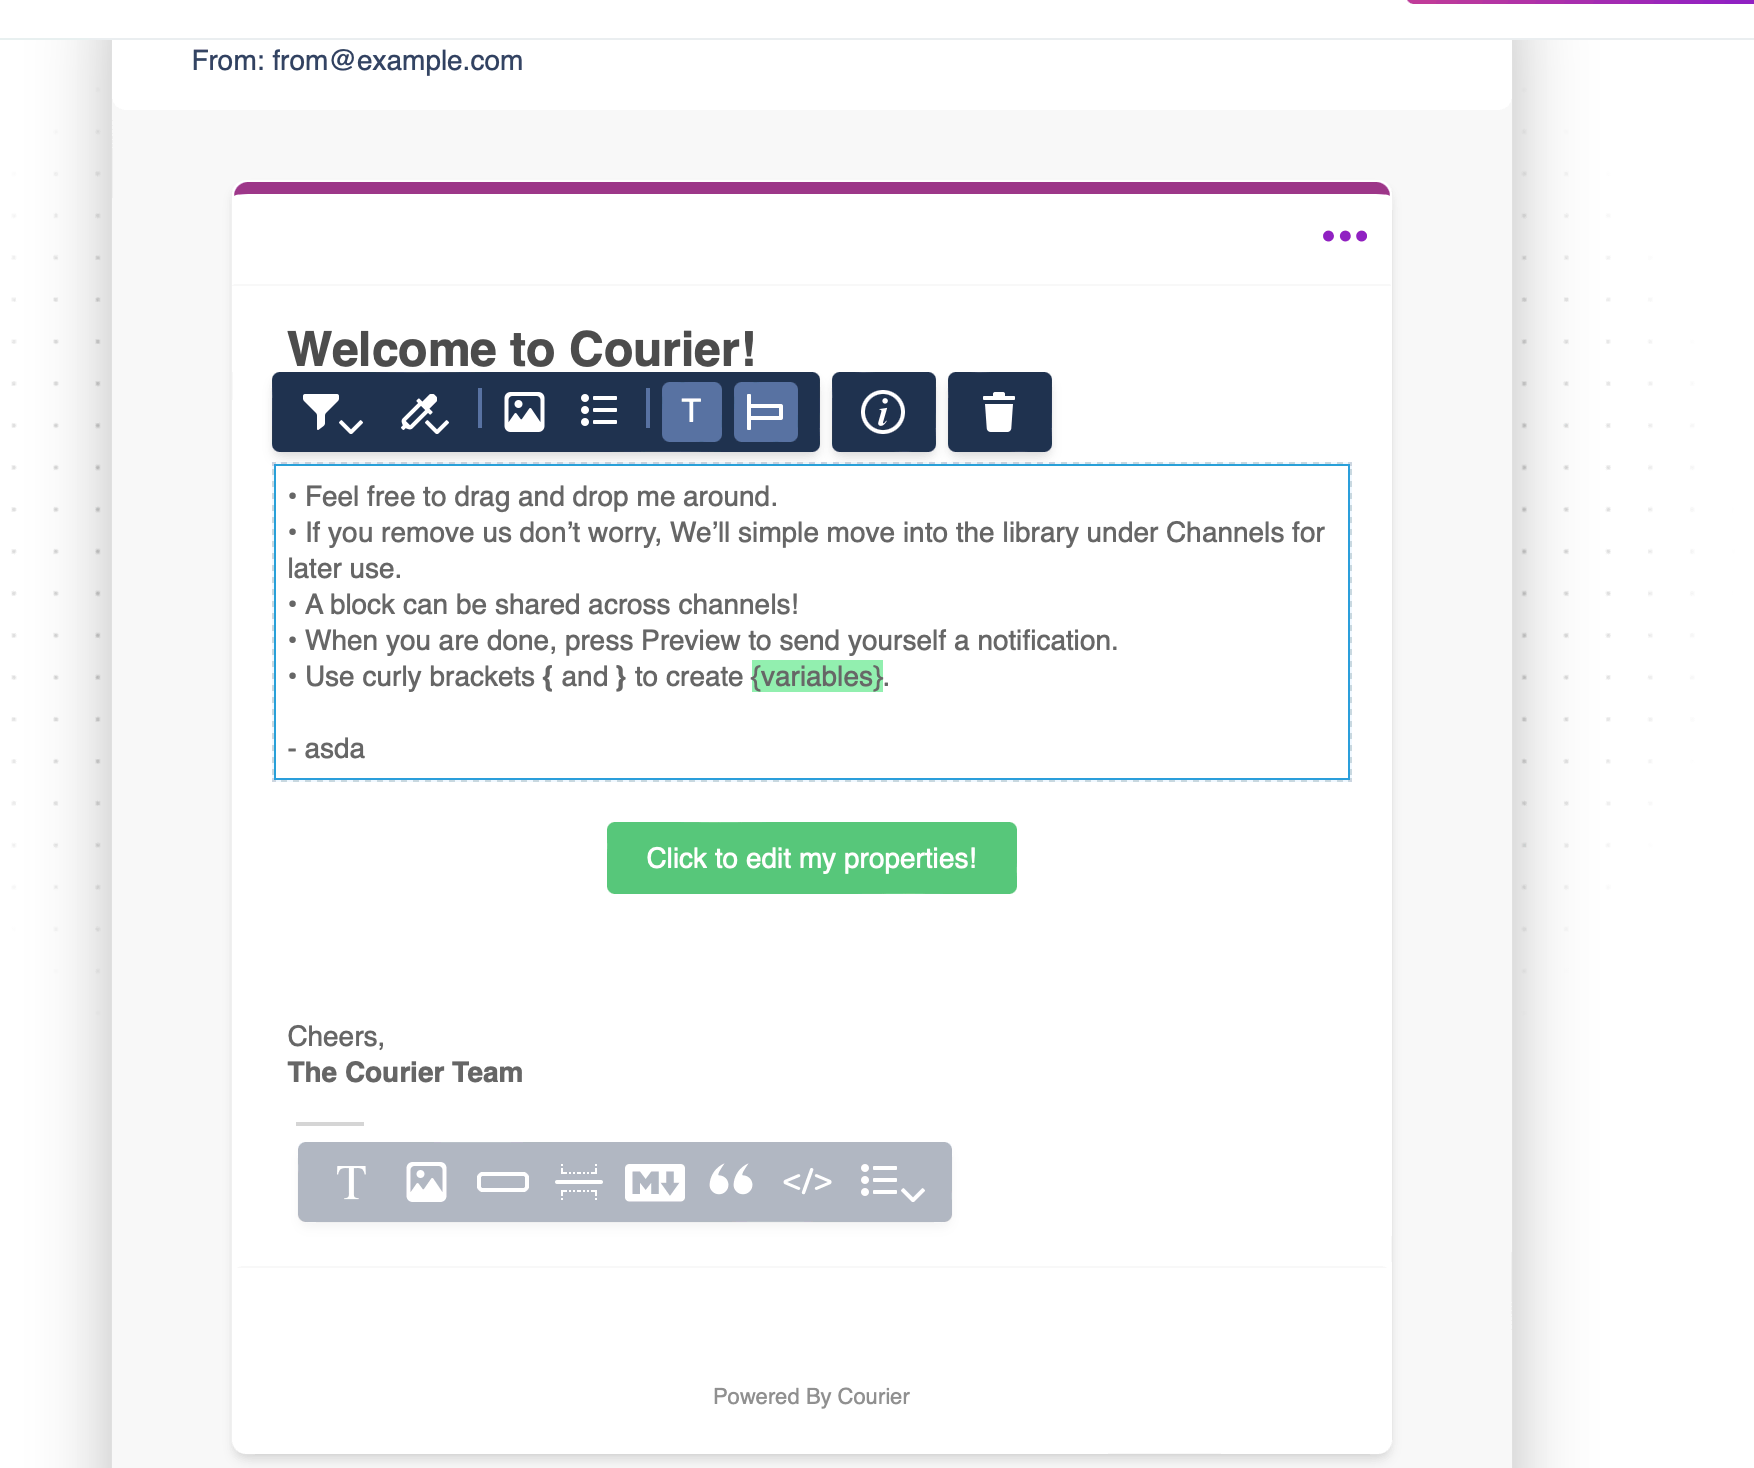 Figure 07 - Customising the Courier Email Template
After customizing your template, publish all the changes.
Then, navigate to the Integrations menu and authorize your Google account to send emails with Courier.
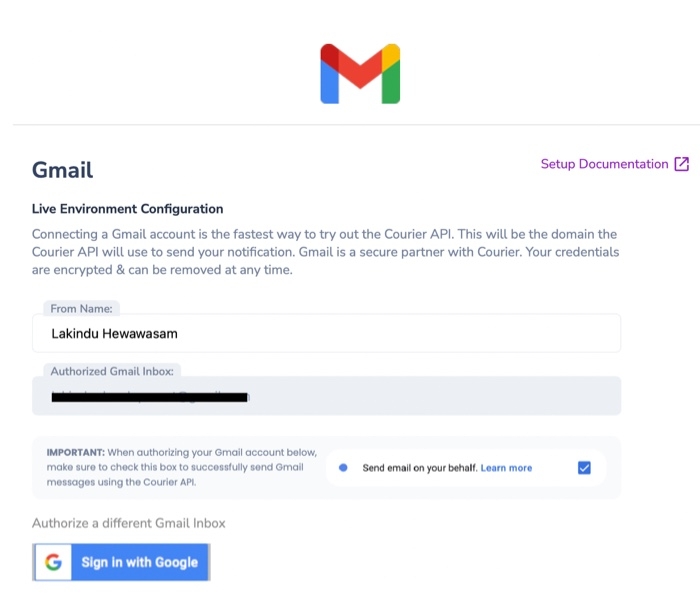
Figure 08 - Authorising Google to send emails using Courier.
Next, we can install the Courier API in the PHP application. Courier recommends installing their SDK using Composer. Therefore use the command shown below.
1
composer require trycourier/courier guzzlehttp/guzzleAfter successfully installing Courier, use the code shown below to send an email through Gmail using Courier.
1
2
3
4
5
6
7
8
9
10
11
12
13
14
15
16
17
18
19
20
21
22
23
24
25
<?php

use Courier\CourierClient; // import courier client

$baseUrl = "https://api.courier.com/";

// create an instance of courier client by passing the Courier API base URL and the Courier Auth Token to access the Email API.
$mail = new CourierClient($baseUrl,"YOUR-COURIER-AUTH-TOKEN");

// configure the recipient information. Each channel accepts different keys
$profile = [
    "email" => "recipient@example.com" //email = email address of recipient
];

$notificationId = "THE-ID-OF-CREATED-NOTIFICATION";
$recipient = "YOUR-RECIPIENT-ID";
$emailData = null;

try {
    $response = $mail->sendNotification($notificationId, $recipient, null, $profile, $emailData); // send the email using Courier for the required Notification. echo 'Email Sent';
} catch (Exception $e) {
    echo 'Caught exception: '.  $e->getMessage(). "\n";
}

?>
You can update the code with your variables and send an email using Gmail. The COURIER-AUTH-TOKEN and the notificationId can be obtained by visiting the settings section of any notification you created.
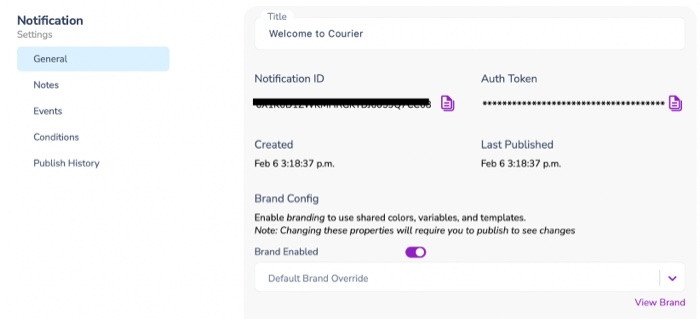
Figure 09 - Obtaining the Auth Token and Notification ID
Courier will send your email via the authorized Gmail account. Once the email gets sent, visit the Courier Dashboard and navigate to the Data section. From there, you have access to many analytical tools such as the delivery, read status, and the errors Courier ran into when sending the email.
Later, you can add more channels and update the $profile variable with its required parameters to support the new notification channels.
Conclusion
This article looked at templated and textual emails and explored five different ways of sending an email using PHP.
I hope this article helps you select the best match for your PHP application. Doing so will help your PHP applications easily send event-driven emails and notifications to ensure that your users stay informed of your applications' events.
Thank you for reading.