Slack
Slack App Requirements
To send notifications via Slack, a Slack App is required. You may use an existing or create a new basic app.
Scopes
The Slack App must be granted the chat:write scope. Additional scopes may be required based on the type of message you send. You can modify scopes by selecting the Slack App from Your Apps and clicking “OAuth & Permissions” from the side menu.
Bot User OAuth Access Token
In order to send a message on behalf of your Slack App using Courier, a Bot User Oauth Access Token will need to be passed in the recipient profile. We’ll refer to this token as the access_token. You can find this token by selecting the Slack App from Your Apps and clicking “OAuth & Permissions” from the side menu.
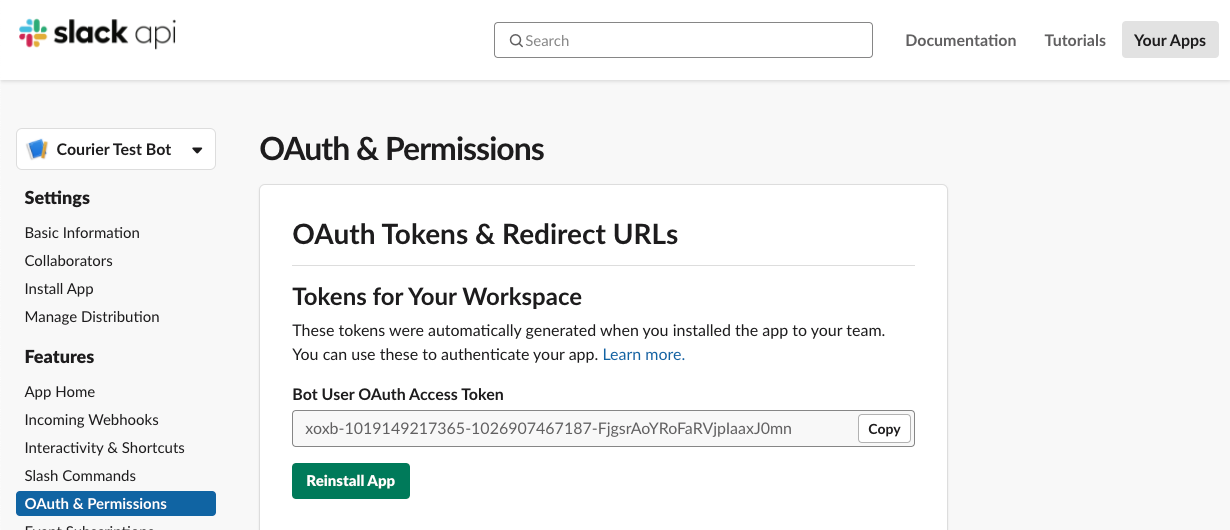
The bot access token will always start with xoxb-.
Profile Requirements
The information required in the recipient profile is different based on the type of message you are sending.
Sending a Direct Message
To send a message to a user, you’ll need to specify the user along with access_token. There are 3 ways to do this.
Sending Direct Messages requires an additional scope. Be sure to grant the im:write scope to your Slack App.
Use the Slack Button
Slack’s Slack Button lets you easily connect your Slack App with your customer’s account. As part of the OAuth process that the Slack Button initiates, Slack will fire a webhook to your servers. Simply store what they send you for that user and send it along to Courier, we’ll take care of the rest.
// Recipient Profile
{
  "slack": {
    // Contents of the JSON object provided by Slack's OAuth access method
  }
}
Using the email associated with Slack
To simplify setting up the recipient profile, we allow you to specify the email used to log into the Slack Workspace and Courier will do the user_id lookup for you.
// Recipient Profile
{
  "slack": {
    "access_token": "xoxb-xxxxx",
    "email": "user@example.com"
  }
}
Using this method requires additional scopes. Be sure to grant the users:read and users:read.email scopes to your Slack App.
Using user_id
For testing, the user_id is found by finding the user in the Workspace Directory, clicking the … button, and selecting “Copy member ID”. For production use cases you would likely retrieve these IDs via the Slack API.
// Recipient Profile
{
  "slack": {
    "access_token": "xoxb-xxxxx",
    "user_id": "UEFNTF6QL"
  }
}
A user_id will always start with a U or W.
Sending to a Public or Private Channel
To send to a public channel your app isn't a member of, be sure to grant your Slack app the chat:write.public scope.
To send a message to a public or private channel, you’ll need to pass its channel along with the access_token. The easiest way to get this value is to open Slack in a browser, navigate to the desired channel and copy it from the URL.

// Recipient Profile
{
  "slack": {
    "access_token": "xoxb-xxxxx",
    "channel": "CL2MR6HEX"
  }
}
In the event that you don't have direct access to the Slack Workspace, you can also retrieve the channel ids using the conversations.list method of the Slack Web API using the access_token. Be sure to request the channels:read scope.
Here is an example that will fetch all public Slack Channels for a workspace and create a Courier Profile for each one using the Courier Node.js SDK.
const { CourierClient } = require("@trycourier/courier");
const { WebClient } = require("@slack/web-api");

// Courier Access Token is stored in COURIER_ACCESS_TOKEN environment variable
const courier = CourierClient();
// SLACK TOKEN must be granted channels:read scope
const web = new WebClient(process.env.SLACK_TOKEN);

const main = async () => {
  // Fetch all public channels for Slack Workspace
  const { channels } = await web.conversations.list({
    types: "public_channel",
    exclude_archived: true,
  });

  // Create a Courier Profile for each channel
  for (let channel of channels) {
    const { id, name } = channel;
    const recipientId = `CHANNEL_${name.toUpperCase()}`;
    try {
      await courier.replaceProfile({
        recipientId,
        profile: {
          slack: {
            access_token: process.env.SLACK_TOKEN,
            channel: id,
          },
        },
      });
      console.log(`${recipientId}: Profile saved for channel ${name}`);
    } catch (ex) {
      console.log(`Error saving profile for channel: ${name}`, ex);
    }
  }
};

main();
This will allow you to send to a channel using a recipient id of CHANNEL_ + the channel name in all upper case .If you wanted to send a message to the general channel, it would look like the following:
{
  "event": "HELLO_SLACK",
  "recipient": "CHANNEL_GENERAL",
  "data": {
    "hello": "world"
  }
}
- A
channelwill always start with aC. - Before you can send to a channel, your Slack app must be invited into it.
Responding to a Slash Command
If you are working with a Slash Command and would like to respond to it, you can use the response_url from the POST payload. This URL can be passed to Courier as a Slack Incoming Webhook.
// Recipient Profile
{
  "slack": {
    "incoming_webhook": {
      "url": "https://hooks.slack.com/commands/1234/5678"
    }
  }
}
response_typeSlash Command responses can either be sent as in_channel or ephemeral. You can set this using an override. Set override.slack.body.response_type to either in_channel or ephemeral in the POST /send payload. The default is ephemeral.
Since the POST payload also contains the channel_id and user_id, you may also respond using the methods above. However, you will need to also use the access_token, make sure the proper scopes are applied, and make sure your app is in the channel if you are responding in channel.
Incoming Webhooks
Incoming Webhooks are a simple way to post messages from your app to a specific public channel. Unless you have a specific use case, we recommend sending using one of the methods outlined above. Follow the Incoming Webhooks Setup Guide and pass the Webhook URL via slack.incoming_webhook.url to the recipient profile.
// Recipient Profile
{
  "slack": {
    "incoming_webhook": {
      "url": "https://hooks.slack.com/services/T00000000/B00000000/XXXXXXXXXXXXXXXXXXXXXXXX"
    }
  }
}
Order of Precedence
The Slack profile should only contain an OAuth Response, Incoming Webhook, or the access_token and one of the following: channel, user_id, or email. If there are multiples, the order of precedence is as follows: channel > user_id > email. For example, if your profile is as follows:
{
  "slack": {
    "access_token": "xoxb-xxxxx",
    "channel": "CL2MR6HEX",
    "user_id": "UEFNTF6QL"
  }
}
The notification will be sent using the channel.
We look for channel, user_id, or email in the incoming request to decide what channel to send the notifications to, and our logic is as follow:
- if
channelis provided in the request, we just usechannel. - if
channelis missing butuser_idis provided in the request, we useuser_id. - if
channelanduser_idare missing butemailis provided in the request, we useemailto derive thechannel
Override
You can use a provider override to replace what we send to Slack’s chat.postMessage method. For example, you can choose to have links unfurl.
{
  "event": "ABCDEFGHIJKLMNOPQRSTUVWXYZ",
  "recipient": "abc123",
  "profile": {
    "slack": {
      "access_token": "xoxb-xxxxx",
      "user_id": "UEFNTF6QL"
    }
  },
  "override": {
    "slack": {
      "body": {
        "unfurl_links": true
      }
    }
  }
}
Common Uses
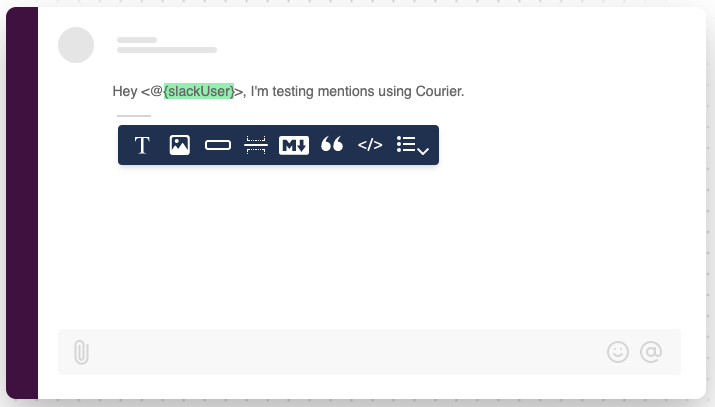
Mentioning Users
You can mention users in a Slack message using the syntax <@USER_ID> in a Notification Designer Block. You can also use a variable to set the Slack User ID.
Learn more about Advanced formatting with special parsing.
Deprecated
Legacy Profile Format
When the Courier Slack Integration first launched, the profile data was accepted in a different format. While it is recommended that you use the format outlined above, the following profile format may still work for some Slack Apps.
// Recipient Profile
{
  "slackToken": "xoxb-xxxxx",
  "slackChannel": "CL2MR6HEX"
}