Create And Send An Email Notification
This step-by-step guide will walk you through creating and sending an email notification using Courier.
Prerequisites
You will need both Courier and a channel provider account integrated with Courier to complete this tutorial. If you don't have accounts already, sign up before proceeding.
- Sign up for Courier
- Sign up for one of Courier's supported integrations
Add an Integration to Courier
Create an account with one of Courier's supported channel providers and integrate it on your Courier Integrations Settings page.
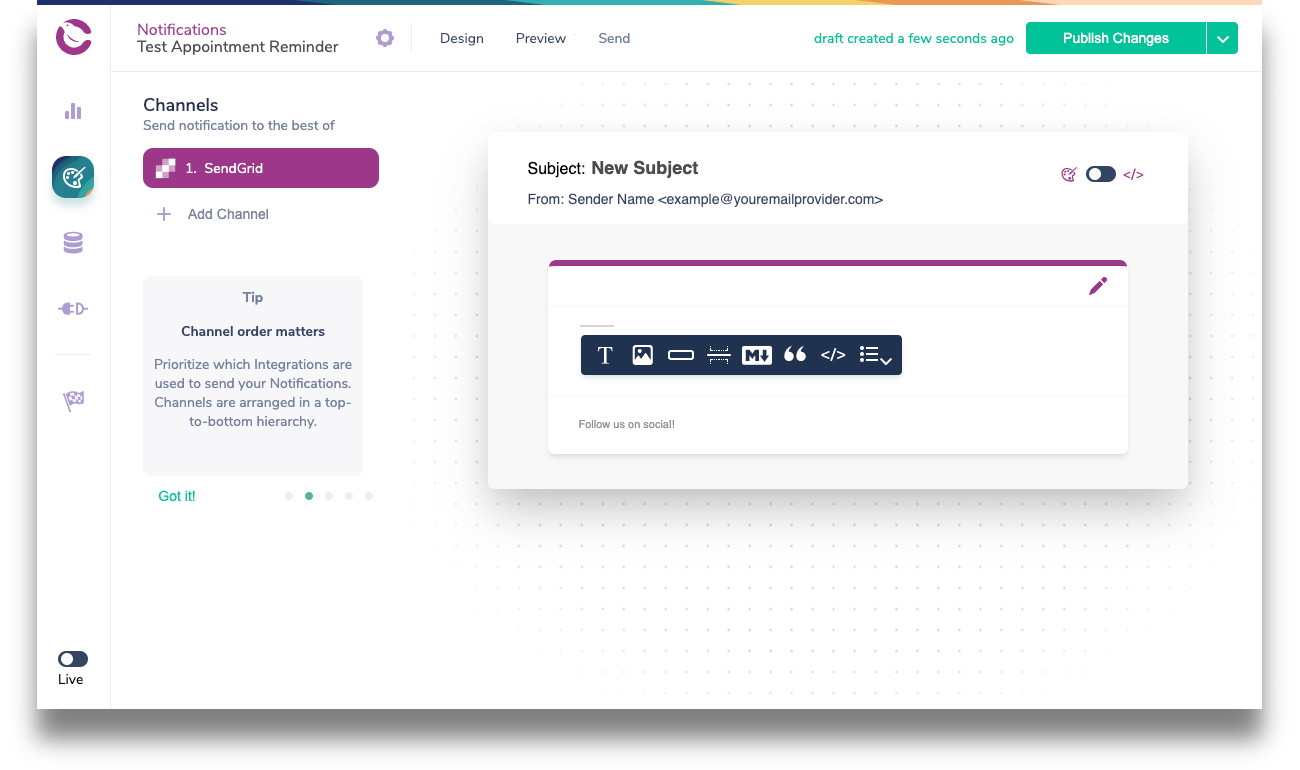
Create a Notification
Navigate to the Courier Notifications page and click “Create Notification.” Click on “Untitled Notification” to rename your notification — for this tutorial, call it “Test Appointment Reminder.” Choose an integration from your list of configured Integrations. Then, click the channel box for that integration that is added to the sidebar to open the template designer.
You can add message blocks to the template by clicking one of the content block icons on the mock-up email.
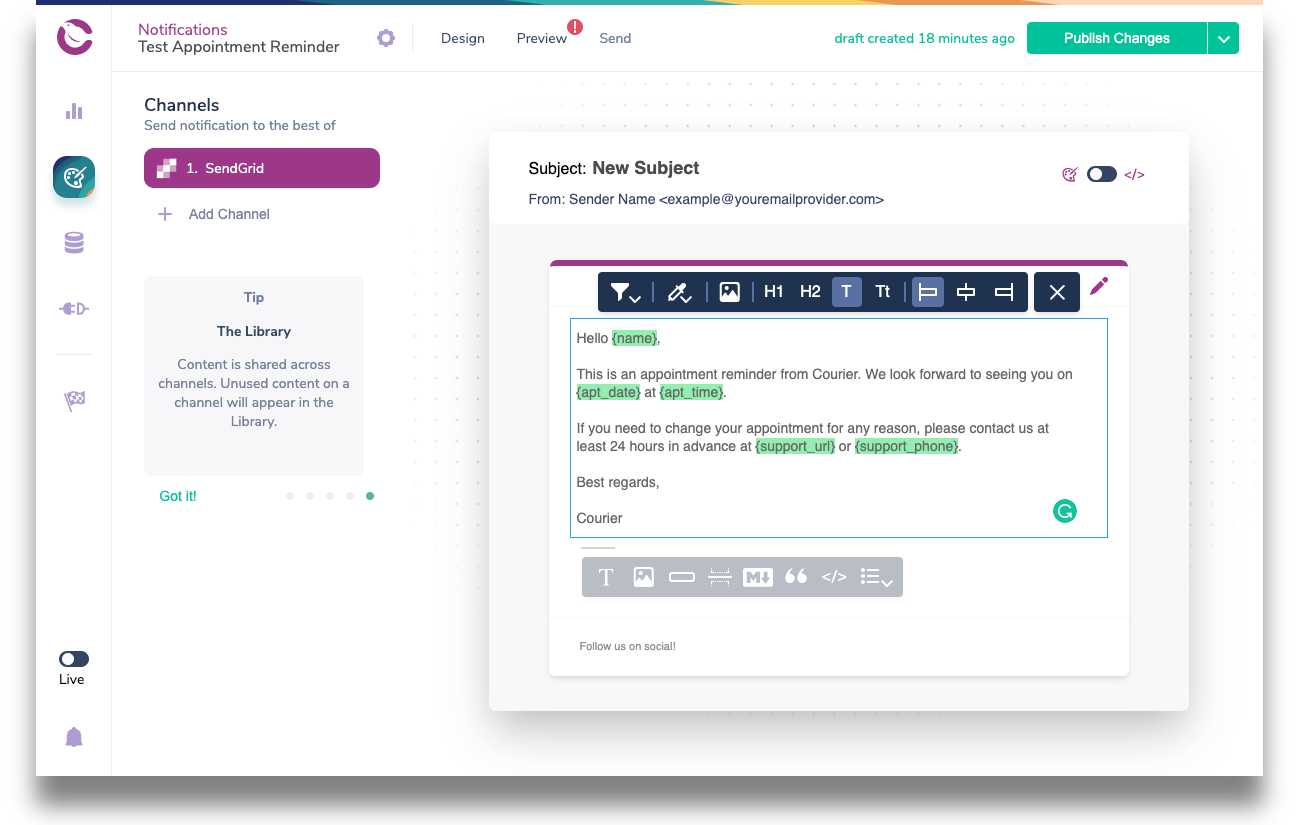
These text blocks can include variables using a mustache-like template syntax. Surround text with a single set of curly braces and that text will be interpreted as a variable (it will also be highlighted in green). For example, you may want to include a {name} variable (we'll cover the source of this variable data later in this tutorial).
If you are creating an email notification, be sure to set the subject line for your email (click “New Subject” to edit it).
Finish populating the notification template with whatever text you want to send. You can also copy the example below, which contains a few variables for demonstration.
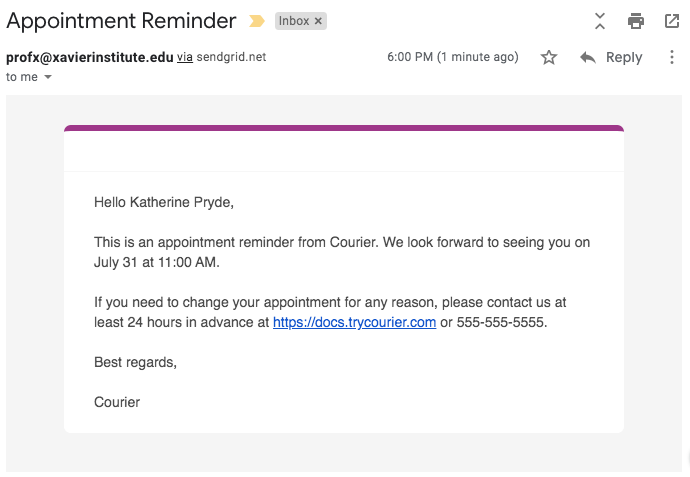
Hello {name},

This is an appointment reminder from Courier. We look forward to seeing you on {apt_date} at {apt_time}.

If you need to change your appointment for any reason, please contact us at least 24 hours in advance at {support_url} or {support_phone}.

Best regards,

Courier
When you are finished, click Publish in the upper right corner.
Send a Message
Courier passes messages to Integrations via the Send endpoint . For this tutorial, we will send our messages with cURL, but you can use your preferred language and HTTP library. You can also use an API testing tool such as Postman or Insomnia. For additional code samples, see the "Courier API Reference."
Authorization
Courier supports both basic and token authorization. For this tutorial, we will use token authorization. You can read more about authorization in Courier's "Authorization Overview".
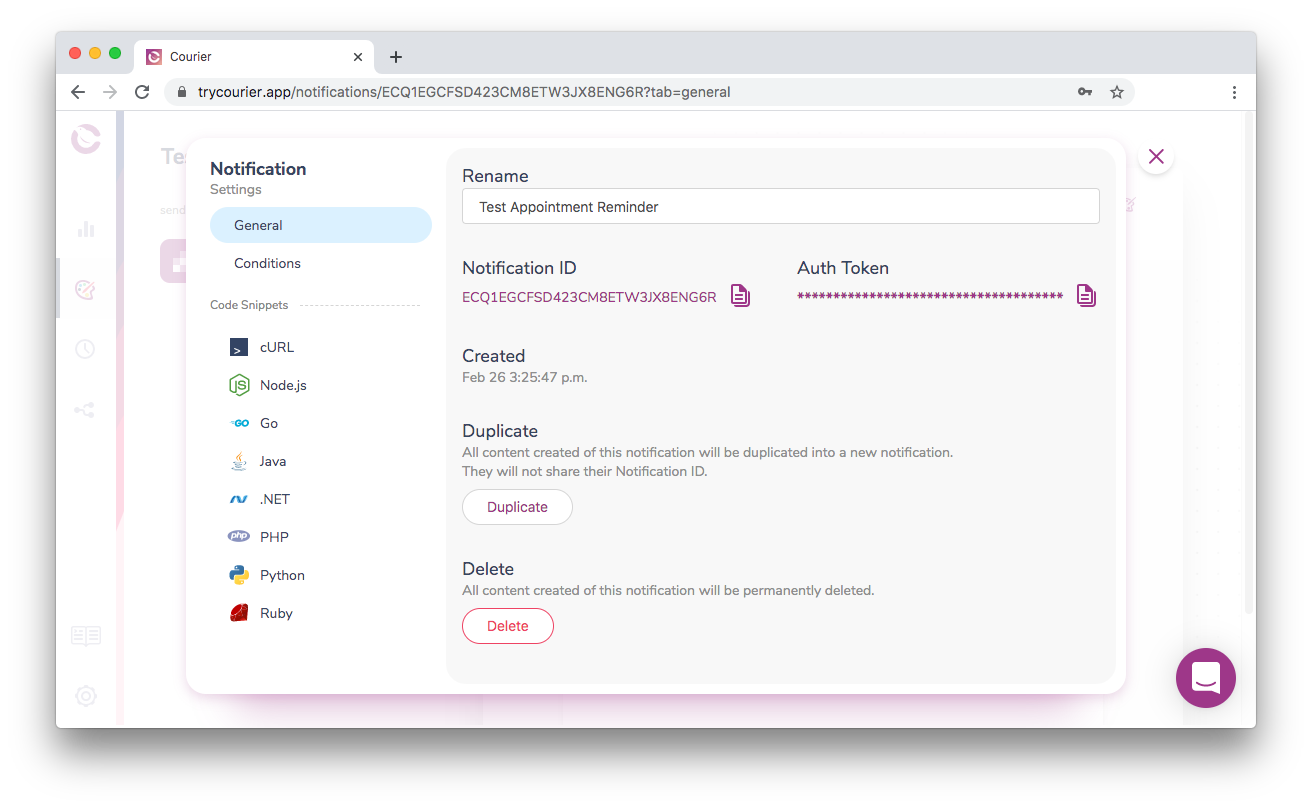
We must send an Authorization header with each request. The Courier Send API also requires an event. The authorization token and event values are the "Auth Token" and "Notification ID" we see in the detail view of our “Test Appointment Reminder” event. Click the gear icon next to the Notification's name to reveal them.
As a best practice, let's assign these values to environment variables. In a Bash terminal, you can add the variables by typing VARIABLE_NAME="<value>". Some examples are provided below. Note that the values are just examples. Do not copy them — be sure to use the tokens associated with your account instead.
Courier Auth Token Variable
COURIER_AUTH_TOKEN="YpW2yEaMDyNg6agN9yGkc9ycEg8MxiKVTiiu2WVc8"
Notification ID
COURIER_NOTIFICATION_ID="YpW2yEaMDyNg6agN9yGkc9ycEg8"
These variables will persist for as long as your Bash session remains alive. If you quit your terminal, you will need to recreate them. However you handle your authorization tokens, keep them secure, and never add them to source control.
To verify that you created the variables correctly, you can see them by typing echo $VARIABLE_NAME. For example, typing echo $COURIER_AUTH_TOKEN will print the Courier Auth Token value to the terminal.
Building the cURL Request
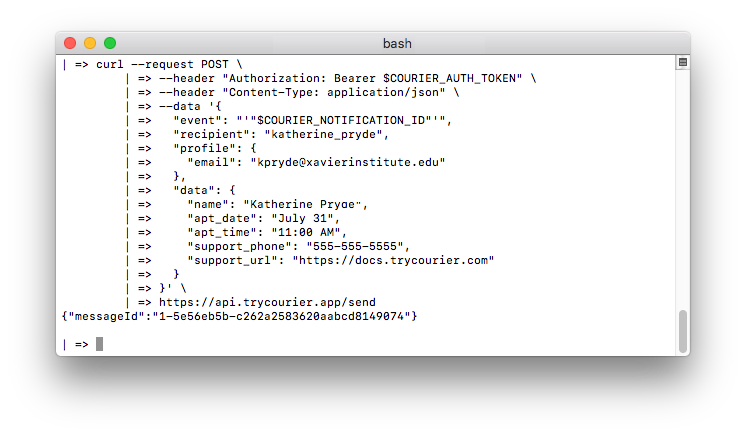
We want to send a POST request to https://api.courier.com/send. Let's build our cURL request line-by-line. First, we'll tell cURL this is a POST request.
curl --request POST
Next, add the Authorization header using the COURIER_AUTH_TOKEN variable we set earlier. We send this as a Bearer Token.
curl --request POST \
--header "Authorization: Bearer $COURIER_AUTH_TOKEN" \
We also have a Content-Type header, which is application/json.
curl --request POST \
--header "Authorization: Bearer $COURIER_AUTH_TOKEN" \
--header "Content-Type: application/json" \
We will pass the body of our request using the cURL --data option. You will often send this data in JSON format. To improve working with cURL, Courier also supports a custom urlencoded format that can be used in the place of JSON. This format allows nested data values using square bracket syntax. This guide provides examples in both formats, so feel free to use the format that you like best.
Our --data option must also contain an event and recipient. Additionally, we will send profile and data objects.
The event value, for this example, is the "Notification ID" that we assigned to our COURIER_NOTIFICATION_ID environment variable earlier.
A recipient should be a unique identifier that does not change. This prevents duplicate entries in the event that a recipient changes their email or some other identifying value. We do not have any recipients in this tutorial, so we can enter any string value. Something like “katherine_pryde” will work.
The profile information is an object that includes any key-value pairs required by our Integrations. You can find the required keys for any Integration by selecting an Integration on the "Integrations" page. See the "Integration Provider Requirements" for details.
Lastly, we define message variables inside the data object. Remember the variables we set in the
visual template editor? This is where we provide the values. Our example message had name,
apt_date, apt_time, support_phone, and support_url variables. For this tutorial, we can
assign example strings to each.
Our --data option should look like this:
- JSON
- cURL urlencoded
{
  "event": "'"$COURIER_NOTIFICATION_ID"'",
  "recipient": "katherine_pryde",
  "profile": {
    "email": "kpryde@xavierinstitute.edu"
  },
  "data": {
    "name": "Katherine Pryde",
    "apt_date": "July 31, 2019",
    "apt_time": "11:00 AM",
    "support_phone": "555-555-5555",
    "support_url": "https://courier.com/docs"
  }
}
--data "event=$COURIER_NOTIFICATION_ID" \
--data "recipient=katherine_pryde" \
--data "profile[email]=kpryde@xavierinstitute.edu" \
--data "data[name]=Katherine Pryde" \
--data "data[apt_date]=July 31" \
--data "data[apt_time]=11:00 AM" \
--data "data[support_phone]=555-555-5555" \
--data "data[support_url]=https://www.courier.com/docs/" \
Now add the Send URL, https://api.courier.com/send, to complete the cURL request.
Complete cURL Request in both Formats
- cURL in JSON
curl --request POST \
--header "Authorization: Bearer $COURIER_AUTH_TOKEN" \
--header "Content-Type: application/json" \
--data '{
  "event": "'"$COURIER_NOTIFICATION_ID"'",
  "recipient": "katherine_pryde",
  "profile": {
    "email": "kpryde@xavierinstitute.edu"
  },
  "data": {
    "name": "Katherine Pryde",
    "apt_date": "July 31",
    "apt_time": "11:00 AM",
    "support_phone": "555-555-5555",
    "support_url": "https://courier.com/docs"
  }
}' \
https://api.courier.com/send
```

</TabItem>
<TabItem value="bash-urlencoded" label="cURL urlencoded">

```bash
curl --request POST \
--header "Authorization: Bearer $COURIER_AUTH_TOKEN" \
--header "Content-Type: application/json" \
--data "event=$COURIER_NOTIFICATION_ID" \
--data "recipient=katherine_pryde" \
--data "profile[email]=kpryde@xavierinstitute.edu" \
--data "data[name]=Katherine Pryde" \
--data "data[apt_date]=July 31" \
--data "data[apt_time]=11:00 AM" \
--data "data[support_phone]=555-555-5555" \
--data "data[support_url]=https://www.courier.com/docs/" \
https://api.courier.com/send
Before sending this request, be sure to replace the kpryde@xavierinstitute.edu value with an email address you can access. Also, note the "'"$COURIER_NOTIFICATION_ID"'" formatting in the JSON formatted --data option. The quotes are necessary to escape the JSON quotes and access the COURIER_NOTIFICATION_ID variable.
Paste your complete cURL request in either format in your terminal and hit "Return." You should receive a response like {"messageId":"<message id string>"}. You will also receive an email at the address you specified in the request body. Be sure to check your spam folder if the message doesn’t arrive in your inbox.
Congratulations, you’re on your way to crafting a better notification strategy that your audience is sure to appreciate.
Overrides (Advanced)
Overrides can be used to change the request body that Courier uses to send an email. Overrides are useful when a field is not yet supported by Courier or you would like to override the value that Courier generates.
For a list of fields you can override for any Courier integration provider, see the "Overrides" section of that provider's integration doc.
Below is an example of overriding the subject and adding an attachment to a SendGrid email.
{
  "event": "<COURIER_NOTIFICATION_ID>",
  "recipient": "katherine_pryde",
  "profile": {
    "email": "kpryde@xavierinstitute.edu"
  },
  "data": {
    "name": "Katherine Pryde"
  },
  "override": {
    "sendgrid": {
      "body": {
        "subject": "Requested file - lockheed.json",
        "attachments": [
          {
            "content": "eyJmb28iOiJiYXIifQ==",
            "type": "application/json",
            "filename": "lockheed.json"
          }
        ]
      }
    }
  }
}